Pages

Category

Techno (122) Gadget (84) Komputer (81) Smartphone (76) Internet (74) Tips dan Trik Komputer (64) Pernak pernik (57) Android (51) Facebook (25) Softwear (22) Computer Virus (20) Game (18) Antivirus (15) Job Application (15) Symbian (15) sex (15) Movie (14) Berita Unik (13) Kesehatan (11) Hardwear (4) BlackBerry (3) Gosip (2) Camfrog (1) Hukum (1) humor (1)
Showing posts with label Tips dan Trik Komputer. Show all posts

Friday, June 8, 2012

Chimo Ngeblog : Membuat Account iTunes Tanpa Kartu Kredit

Menarik nih, karena saya sudah punya account iTunes dari lama, saya baru menyadari kalau sekarang bisa buat account iTunes tanpa harus memasukan nomor kartu kredit. Dulu saya pun buat harus  memasukan kartu kredit.
Meskipun Anda tidak memasukan nomor kartu kredit, tetapi apabila ingin membeli aplikasi Anda tetap harus memasukannya. Ya iya lah kalau tidak bagaimana cara membelinya ya..:P. Tetapi kalau hanya sekedar mendownload aplikasi yang free sudah langsung bisa di jalankan. Sebenarnya mungkin ini sudah lama tetapi sekedar membagikan tips, berikut tipsnya
  • Pastikan Anda sudah menginstall software itunes terbaru di PC or Mac. Kalau belum, silahkan download terlebih dahulu dari apple.com
  • Kalau sudah terinstall, buka iTunes lalu klik link iTunes Store yang ada di sebelah kiri.
  • Klik link App store di sisi paling atas
  • Pilih free app to download. Cara yang paling mudah adalah dengan mengscroll ke bawah dan free app box ada di sebelah kanan. Arahkan mouse ke item yang pertama dan klik free button yang akan muncul ketika mouse diarahkan.
  • Akan muncul pop up yang akan menanyakan untuk sign in with your Apple ID. Pilih create new account. Sekarang pilih lanjutkan create new account
  • Kasih tanda cek  untuk accept the Store Terms and Conditions, lalu lanjutkan
  • Masukan
  • Masukan email address, password, security question,  tanggal lahir  dan lanjutkan.
  • Nah sekarang Anda akan ditanya untuk menyiapkan cara pembayaran. Tetapi sekarang ada pilihan “None” di opsi terakhir
  • Sekarng masukan alamat tagihan kartu kredit Anda. Masukan saja alamat tagihan kartu kredit meskipun Anda tidak memasukan nomor kartu kredit. Lanjutkan maka akun Anda sudah selesai dibuat.
  • Kalau ditanyakan adress verification screen, masukan negara tempat tinggal Anda lalu klik done
  • Nanti Anda akan dikirimkan email untuk verifikasi.
  • Buka email Anda, maka akan ada link untuk verifikasi account yang Anda buat, lalu setelah anda klik linknya, iTunes akan terbuka dan meminta Anda untuk memasukan Apple ID dan password yang sudah Anda buat.
  • Selamat! Anda sudah mempunyai akun iTunes baru tanpa harus menggunakan kartu kredit
Silahkan download aplikasi-aplikasi gratis dari Appstore.
READ MORE - Chimo Ngeblog : Membuat Account iTunes Tanpa Kartu Kredit

Tuesday, December 27, 2011

Chimo Ngeblog : Cara me-Refresh RAM Komputer

RAM (Random Access Memory) adalah satu komponen yang bertanggung jawab terhadap
semua aktifitas sistem komputer. Semua proses
aplikatif yang berjalan pada
sistem akan tersimpan di
dalam RAM, baik itu yg
diperlukan ataupun tidak
diperlukan oleh sistem
komputer. Proses-proses yg
tidak diperlukan oleh sistem
inilah yg sering menyebabkan
komputer berjalan lambat,
error , ataupun nge hang/lag.
maka dari itu, kita perlu
untuk selalu rutin
menyegarkan kembali kinerja
RAM. Masalahnya adalah anda
butuh tools tertentu, atau
menggunakan cara
konvensional untuk
menyegarkan RAM. nah, ane
kali ini akan membahas
bagaimana cara menyegarkan
RAM dgn hanya memakai
notepad saja.
Jalankan aplikasi notepad
dulu.. habis itu ketik bentuk
script berikut ini..
Code:
FreeMem=(1280000000)
FreeMem=(2560000000)
FreeMem=(5120000000)
FreeMem=(10240000000)
Simpan script dalam format file Vbscript (Vbs). klik menu file->Save as.
kasih nama, misalnya Refresh RAM.vbs dan klik tombol save utk menyimpan script. Untuk menyegarkan kembali RAM
komputer cukup lakukan double
click pada Refresh Ram.vbs
secara otomatis script tsb akan
refresh/menyegarkan kembali
RAM kompi..
sumber :http:// www.kaskus. us/
showthread.php? t=10073065
READ MORE - Chimo Ngeblog : Cara me-Refresh RAM Komputer

Sunday, December 25, 2011

Chimo NgeBlog : Melacak lokasi penelepon dengan menggunakan Google Latitude

Beberapa hari yang lalu temen saya menanyakan kepada saya apakah ada cara untuk melacak orang yang menelepon kita dan mengetahui lokasi orang tersebut sepertu yg sering kita lihat di film film detektif yang bisa melacak lokasi targetnya dengan menggunakan alat khusus.Terinspirasi film tersebut disini kita akan mencoba melakukan hal yang sama namun dengan menggunakan bantuan dari mbah Google.Pertama langkah yang harus kita lakukan adalah  Buka https:/ /www.google .com/ latitude/
b. Log In menggunakan akun Google anda.
(Google Akun anda adalah login yang sama yang
Anda gunakan dalam layanan Google seperti
GMail, dll.).
Skip and use Latitude on your computer
c. Setelah kamu meng-Klik beberapa pilihan, lalu
masuklah ke link "Tambah Teman" (letaknya di kiri
atas halaman). Klik pada menu drop-down di
bagian atas kotak dialog dan pilih "All Contacts."
d. Cari sampai kamu menemukan informasi kontak
untuk orang yang teleponnya ingin kamu lacak.
Klik "Teman" tab pada halaman Google Latitude,
kamu akan melihat Google Map di sebelah kanan.
Di sebelah kiri peta adalah daftar teman Latitude.
Klik pada nama teman kamu dalam daftar untuk
melihat mana ponsel orang tersebut di Google
Map. Anda juga dapat melihat berapa lama telah
sejak lokasi itu terakhir diperbarui
e. Kemudian, yang lebih menariknya lagi, aplikasi
ini bukan hanya mencari lokasi saat ini saja.
Dengan Google Latitude ini Anda dapat juga
mencari history (sejarah ) lokasi terdahulu dari
"target pencarian kamu", dan juga melihat status
online/offline dari layanan Google Talk yang
mereka gunakan.
History posisi penelpon kita
Sekedar info:
- Cara diatas bisa kamu lakukan jika kamu online
menggunakan komputer/laptop.
Jika kamu online melalui perangkat mobile maka
ada beberapa perbedaan. Google Latitude
memerlukan Anda dan orang lain untuk menerima
pelacakan. Anda tidak dapat melacak ponsel
seseorang tanpa izin orang itu.
- Google Latitude akan menampilkan lokasi Anda
dan teman Anda di Google Maps. Jika telepon
yang dilacak tidak memiliki kemampuan untuk
menggunakan satelit global positioning atau GPS,
maka Google masih dapat melacak lokasi umum
dengan menggunakan menara seluler atau BTS
terdekat.
Semoga cara melacak posisi lokasi penelpon
menggunakan Google Latitude ini dapat
bermanfaat !!!
Tags : Melacak nomor handphone, mengetahui lokasi penelepon, lacak lokasi handphone,
READ MORE - Chimo NgeBlog : Melacak lokasi penelepon dengan menggunakan Google Latitude

Friday, December 23, 2011

Chimo NgeBlog : Cara Memperbesar/Memperkecil Volume Mp3 dengan Mp3Gain

Kadangkala jika kita mendengar MP3 ada kalanya
suara lagu antara satu lagu dengan lagu lain tidak
sama, kadang- kadang lagu pertama suaranya
menggelegar sedangkan satu lagu lain suaranya
kecil, pasti deh kita sebagai pendengar MP3
rasanya agak jengkel. lewat software yang
bernama MP3 Gain, file berjenis MP3 ini mampu
dibuat bisa normal, bahkan suara yang tadinya
terdengar pelan dapat dibuat menjadi lebih besar.
dan satu lagi software ini berjenis freeware .
Berikut ini adalah cara-cara penggunaan
software ini:
1. First step tentu saja jalankan software ini,
kemudian klik Add files untuk memasukkan MP3
yang akan kita normalisasikan suaranya (disini
saya mencoba untuk memperbesar suara MP3 ).
2. Sebelum memperbesar suara perhatikkan
kolom Target Normal Volume. Dalam kondisi
default, kolom ini terisi angka 89.0 Artinya dalam
kondisi default, aplikasi ini membuat file MP3 anda
berukuran 89.0 desibel. Kolom ini berfungsi untuk
menentukan berapa angka yang akan kita
keraskan suaranya.
3. Sedangkan ikon Track Analysis untuk
menganalisis berapa desibe volume suara MP3
anda.
4. Kalo kamu sudah menganalisis dan sudah
mengetahui ukuran aslinya yang bisa dilihat di tab
volume, jika dibawah 92 desible suaranya masih
pelan. Biasanya saya menggunakan nilai 98 pada
kolom Target Normal Volume. Langsung aja anda
klik tombol Track Gain untuk memperbesar suara.

Download MP3 Gain:
sourceforge.net/projects/mp3gain/files/MP3Gain-Windows%20(Stable)/1.2.5/mp3gain-win-1_2_5.exe/download

READ MORE - Chimo NgeBlog : Cara Memperbesar/Memperkecil Volume Mp3 dengan Mp3Gain

Thursday, November 24, 2011

Chimo NgeBlog : The Difference Between Computer virus, Worm, Spyware, Trojan viruses, Adware and spyware

Computer virus propagates in to other files through affixing itself in to computer. It needs a carrier to get involved with computer as well as harms other files.
Earthworm has an ability to duplicate as well as sends itself in to other computer through e-mail, this can mejor antispyware not really spread in to other file however harm system rather.
Trojan could not spread in to other file, could not transmit itself in to other computer however fools a user to obtain this to set in to computer. Because Trojan offers installed, it’s incontrollable. There are lots of kinds of Trojans.
Spyware will not spread in to other file, not really transmit itself in to other computer, however fools a user to obtain this in to computer or by a space of internet browser to install as well as infringe a owner’s privateness.
Hybrid Malware/Blended Threats is actually Malware which includes all the capability of Computer virus, Earthworm, Trojan as well as Spyware together.
Phishing is a technique of creating a social engineering by using e-mail to fool person to reveal financial statement such as credit card or online bank account.
Zombie Network Numerous computer systems that become a victim of Earthworm, Trojan and other Pasos Para Eliminar Un Spyware Malware will be utilized by attacker/hacker to be an address for delivering junk e-mail mail, phishing, DOS or even to maintain a few unlawful software within.
Malware has an abbreviation from Malicious Software means all programs that have aggressive in the direction of to computer as well as system, or it could be a name to call a good ill aim of plan such as Computer virus, Earthworm, Trojan, Spyware, Keylogger, Crack Tool, Dialer, Phishing, Plugin, BHO, etc.
Owing to Computer virus may be the very first Malware that occurs as well as understands for very long so, a few information or an informal article that’s much less stressed uses this particular word “Virus” instead of “Malware” In the fact, this is wrong. Anyhow each Malware is actually distinction.
Buy online with online coupons as well as special offers, save up your money. Discovering Que Es Un Malware low cost from as well as much deeper discount rates. is among the web site that offers lots of special web protection discount which will help guide you towards the the most suitable plan to safe your pc.
READ MORE - Chimo NgeBlog : The Difference Between Computer virus, Worm, Spyware, Trojan viruses, Adware and spyware

Saturday, October 29, 2011

Chimo NgeBlog : 10 Tips for Safe Computing

Today, we are more dependent on computers and the information that they store than ever before.  From spyware, viruses, and Trojans to identity theft and computer hardware malfunctions —any disruption can have a huge impact on our lives.  No matter how savvy the user, safe computing practices are a combination of physical protections using computer software and security settings and the secure actions of the user. You need both to make a difference. Below are 10 tips that will help you protect your computer and ultimately the information stored on it.   
1. Keep your computer updated:
1.     In the evolving world of software viruses, it is essential that computer owners use anti-virus software and keep it up-to-date.  Most anti-virus software gives the user the ability to do automatic updates.
2.      Whether individuals choose to update their operating system software automatically or manually, we recommend making it a continuous process.  It is also important to keep other software on your computer updated.  Software updates often include essential bug fixes and security features that address existing vulnerabilities.
3.     Finally, enable the personal firewall on your computer. This will help to keep unauthorized people from snooping around your computer when it’s connected to the Internet
2. Create strong, secure passwords
There is power in strong passwords.  We recommend passwords that contain at least 8 characters with a combination of letters, numbers and symbols.  Strong passwords are less likely to be hacked than very generic passwords.  Use creative pass-phases to avoid having to write down a password.  Do not share your passwords with anyone.
3. Download files legally
Along with the possibility of significant legal penalties, downloading music and movies from peer-to-peer networks can be harmful to your machine.  These downloaded files are sometimes riddled with viruses and spyware. 
4. Keep personal information safe
Reduce your risk of identity theft.  Never share your personal information via email, no matter how official the email looks.  Official business that requires personal information should not happen via unsecured email. 
5. Scan email attachments and validate links
In an effort to keep viruses off your machine, scan all attachments that are sent to you.  Viruses can lurk in emails from friends and family.  While you may be fooled about an email that contains a photo you would like to see from a friend, anti-virus software will know the difference.  If you receive a link in an email from a trusted source, hover over the link using your mouse and look in the bottom bar of your web browser to reveal the true URL and validate that the link is legitimate. This will ensure that you know where you are going on the Internet, and whether or not you want to go there.
6. Lock your computer
When leaving your computer unattended, physically lock it to prevent theft of the machine.  We also suggest that users lock the screen with a password to safeguard data. 
7. Log off any public areas
Remember when using a public computer or network, it is just that…public.  Be sure that you completely log off  the site or machine when you are finished using it.  Users should be especially mindful to uncheck boxes that will remember users’ login information when logging into online services, such as email and bank accounts. 
8. Back up important data
We have seen final papers vanish—hard drives crash and files become corrupt.  If you have important information that you cannot afford to lose, back it up.  We recommend that you store this information securely and even consider storing extra copies at another location.
9. Limit information on social media sites
People will post almost anything on social media site.  For many people, birth dates, anniversaries, addresses, phone numbers, and a lot of other personal information can be found on social media sites.  Protect yourself from identity theft and other scams by limiting what information you disclose online and who can see that information. 
10. Avoid surfing websites that you don’t already know
Browsers are quickly becoming one of the larger vulnerabilities in computing. Adware and spyware are written specifically to exploit Internet Explorer and Firefox. So try and stick with the websites you trust.
While these steps are not foolproof, they will go a long way towards extending the life of your machine and protecting the valuable information contained on it. 

READ MORE - Chimo NgeBlog : 10 Tips for Safe Computing

Tuesday, August 16, 2011

Chimo NgeBlog : SSDownloader: 50 security apps in just a few clicks


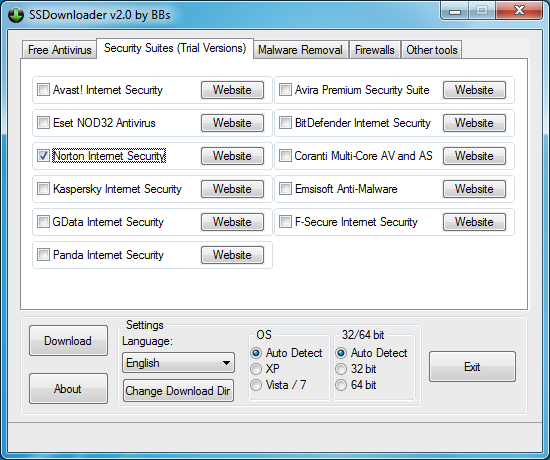
Your friend's PC has been hit by malware, and you're trying to help him out. He doesn't have any security apps installed, though, and so normally that means a lengthy browsing session around your preferred vendors, locating and downloading the tools they need.Unless, that is, you've a copy of the free, portable SSDownloader to hand. It's a small and easy-to-use download manager that can grab your choice of 50 security applications in just a few clicks.

The program presents its applications in well-organised tabs. If you're looking for an antivirus tool, say, just click the Free Antivirus tab, check the box next to your choice of engine (Avast!, AVG, Comodo, Avira, Microsoft or Panda), and click Download. SSDownloader will then figure out the file you need (XP or Windows Vista/ 7, 32 or 64-bit) and grab a copy for you.

Other tabs provide support for downloading all the main firewalls (Comodo, ZoneAlarm, Online Armor, OutPost and more) and malware removal tools (Malwarebytes, SuperAntiSpyware, HiJack This, Spybot -- Search and Destroy, and so on). An "Other Tools" tab includes useful accessories and diagnostic utilities (AutoRuns, Process Explorer). And if the free tools simply aren't enough, then there's also support for downloading your selection of eleven security suites (Avast!, Avira, BitDefender, Norton, Kaspersky, F-Secure and more).

SSDownloader isn't trying to do anything too clever. It won't attempt to install the applications it downloads, for instance; that's your job. And it doesn't check your system to see what's installed, or alert you to any updates. This is just about downloading the setup files you choose, and nothing more.

If you regularly work with new or poorly equipped PCs, though, SSDownloader has more than enough power to save you plenty of time and hassle, and it's the perfect candidate for a place in your portable troubleshooting toolkit.


READ MORE - Chimo NgeBlog : SSDownloader: 50 security apps in just a few clicks

Tuesday, August 9, 2011

Chimo NgeBlog : Fake Firefox update email - don't click, or you may have your passwords stolen


Although we see some very sneaky social engineering tricks used by scammers and cybercriminals on occasions, designed to trick users into making unwise decisions, we also see some very basic attempts at online crime.

Take, for instance, this email which was spammed out this weekend pretending to be an advisory about a new update to the popular Firefox web browser.

Hopefully no regular reader of Naked Security would fall for it.

Fake Firefox update email

Subject: New version released.

Message body:

Important notice
A Firefox software update is a quick download of small amounts of new code to your existing Firefox browser. These small patches can contain security fixes or other little changes to the browser to ensure that you are using the best version of Firefox available. Firefox is constantly evolving as our community finds ways to make it better, and as we adjust to the latest security threats. Keeping your Firefox up-to-date is the best way to make sure that you are using the smartest, fastest and . most importantly . safest version of Firefox available. A Firefox update will not make any changes to your bookmarks, saved passwords or other settings. However, there is a possibility that some of your Add-ons won.t be immediately compatible with new updates.
For security reasons please update your firefox version now
[LINK]

There are no surprises here. The link downloads an executable file, which bundles together an installer for Mozilla Firefox 5.0.1 and... a password-stealing Trojan horse.

Sophos already detected the Trojan horse as Troj/PWS-BSF.

Our labs have also added detection for the actual bundle itself, which we're identifying as Troj/Mdrop-DPO.

You should always exercise caution when you're asked to click on a link in an unsolicited email.

And, in particular, don't forget that Firefox automatically updates itself - so you should never have to act upon an email like this. If you want to manually look for the latest update, simply open Firefox and go to the Help menu and select About Firefox.

Here's a link to Mozilla's website, where you can download the real latest version of Firefox.

READ MORE - Chimo NgeBlog : Fake Firefox update email - don't click, or you may have your passwords stolen

Tuesday, August 2, 2011

Chimo NgeBlog : Helpful tips for using Google's Chrome browser

Google's Chrome browser has taken the web world by storm. It quickly established itself as a bona fide competitor to Firefox, Internet Explorer and other browsers.

Chrome is truly a powerhouse among browsers and here are some tips to help you get the most out of it.

1. Multiple home pages - Click the wrench icon and go to Tools then Basics to have more than one site open when you start your browser.

2. Check your tabs - If you think a tab is misbehaving and sucking up a lot of resources, just hit Shift+Esc to open Chrome's task manager. You check your tabs and close any that are using too many resources.

3. Turn web pages into app shortcuts - App shortcuts will open in a browser window without browser buttons. This is handy for sites like Gmail, YouTube, etc. Click the wrench icon, then tools then create application shortcuts and hit the creat button.

4. Back button navigation - If you've gone a way into a site there's an easier way to find your way back. Click the back button and hold it to see a list of pages you've viewed. This is much faster than just clicking the back button over and over again to navigate backwards.

5. Edit a site's code - If you've ever thought you could do a better job coding somebody's site, this feature is for you. Right click on a page and select inspect element. You can make changes to the code that will only be visible in your browser.

READ MORE - Chimo NgeBlog : Helpful tips for using Google's Chrome browser

Thursday, July 28, 2011

Chimo NgeBlog : 40 Google+ Tips and Tricks for Power Users


Google+ is all the rage right now. Even under its limited-invite "field trial" phase, the social sharing service is growing in leaps and bounds, with oodles of new users joining every day and even more champing at the bit to get in.

Most of us, however, are only beginning to scratch the surface of what Google+ can do; like many Google products, G+ is brimming with advanced features and untapped tweaks. That's why I decided to put together this massive list of Google+ tips and tricks. It includes some of the best power-user pointers I've found both from my own experimentation and from following some really smart folks in the Google+ universe.

For more G+ tips and general tech talk, be sure to join me on Google+ as well. I promise I won't bite -- at least, not unless you ask really nicely.

Google+ Tips Part 1: The Stream

1. Use hotkeys to get around Google+ faster. In your Stream, press "j" or "k" to move through posts, and press Enter to start a comment. (Pressing Tab and then Enter will cause your comment to be submitted; hitting Tab twice and then Enter will cause it to be cancelled.) You can also press "q" to jump to the Google+ chat box.

2. Hotkeys work in the notification drop-down, too: Press "j" or "k" to move up or down in the list, and then press Enter to open any individual notification. When viewing a notification, "j" or "k" will let you progress forward or backward to other items. Pressing "Esc" will close the notification window altogether.

3. Want more hotkeys? Check out the G+ Extended extension for the Chrome Web browser. It adds a series of additional options, including hotkeys for +1'ing posts, sharing posts, and expanding comments.

40 Google+ Tips and Tricks for Power Users4. If comments are getting out of control in your Stream, try the +Comment Chrome extension. It collapses all comment threads so you see them only when you click to expand. Another good option is the G+me Google+ extension; it leaves comments expanded by default but gives you a one-click option to collapse any thread or post on demand. It also provides badge-style comment counters to help you keep tabs on new activity for items you've collapsed.

5. You can take a specific item entirely out of your Stream by clicking the small drop-down arrow next to it, then selecting "Mute this post." That'll also keep you from receiving any future notifications about the item.

6. On your own posts, that same drop-down arrow holds options to shut down comments and prevent people from resharing. The commands affect only the specific item you're viewing.

7. Sometimes leaving a comment on an active post can turn into a bouncing-screen challenge, thanks to the top-of-page activity always pressing your Stream downward. To solve this, click the drop-down arrow next to the post you're viewing and select "Link to this post." That'll open the post in a new tab; type your comment there, then close the tab when you're finished.

8. Google+ lets you stylize text within posts and comments. To italicize, sandwich your text with underscores _like this_; to make text bold, use asterisks *like this*; and to create a strikethrough effect, use dashes -like this-.

9. Make Google+ a little easier on the eyes with the Google+ Ultimate extension for Chrome. It separates posts into individual boxes with an offset background and forces the top status bar and left sidebar to stay in fixed positions while you scroll. Another good option is the similar Usability Boost extension; it gives a slightly different modified look to the site that some users may prefer.

10. Mention (or "tag") someone in a post or comment by typing "+" or "@" and then the person's name. Google+ is still a bit wonky at times about bringing up the right result; try typing the name slowly and enclosing it in quotation marks (e.g. +"Bob Sacamano") if you have trouble.

11. Improve the G+ reply mechanism immensely by grabbing the Replies and More Google+ Chrome extension. The extension puts links throughout G+ that let you reply to the author of any post or comment with a single click -- and without all the "+"-typing hassle.

12. To start a private conversation with a friend or multiple friends, just share an update like you normally would -- but be sure to remove "Public" and any other circles from the share box. Then, tag your friend or friends using the "+" syntax mentioned above. They'll receive notifications about the message, and you'll be able to have an ongoing dialogue in the comments for the post. If you want to be extra safe, you could also disable resharing using the process described in tip #6.

13. Power up your Google+ Stream with the +Photo Zoom Chrome extension. With it installed, you can hover your mouse over any photo in your Stream to see an enlarged version of the image right there.

14. The Google+ mobile app allows you to view posts from people in your geographic area (using the section labeled "nearby"). Little-known fact: You can access that function from your desktop, too; just load the mobile version of Google+ to do it.

15. The Google+ mobile app has a hidden feature of its own: When viewing your Stream, press the menu key and select "Manage Views." Then, check off all your favorite circles and select "Done." You'll now be able to swipe right from the main Stream to view those circles individually.

Google+ Tips Part 2: Circles

16. Use Google+ to save posts and other important content. Go to your Circles page and search for your own name. Add yourself to a new circle called ".Save" (or something to that effect). Then, anytime you see something in your Google+ Stream that you want to save, just share it with your .Save circle. You can browse through your saved stuff by opening your .Save stream (it'll be at the top of the "Stream" list on the left-hand side of your Google+ home page). No one other than you will be able to see it.

17. If you use a note-taking service like Evernote, you can save content directly from Google+ into your off-site notepad. First, find your account-specific Evernote email address. Add that address into a new Google+ circle called "Evernote" -- then, anytime you want to save something from Google+ to Evernote, just share it with that circle. Google+ will send the content in an email, and Evernote will translate it into a notebook item in your account.

18. Want certain circles to show up higher than others in the main Stream list? Circles whose names begin with a period (like ".Save") will always shoot up to the top. Names starting with an asterisk (like "*Important") will appear next.

19. The default Google+ circles will always appear above everything else. To get around this, create your own new circles to replace the default ones (e.g. "My Acquaintances" to replace "Acquaintances," and so on). Be sure to move everyone from the default circle to your new replacement one, then delete the default circle when you're done.

20. When moving people into circles on your Google+ Circles page, hold down Ctrl or Shift to select more than one person at a time. You can also click and drag to draw a box and select multiple people to move.

21. To copy one entire circle into another circle, click on the first circle and select "View circle in tab." Then select "More actions" and "Select all." Now, just drag the entire group down into the other circle and -- voilà! -- the deed is done.

22. Change the layout of the Circles page by clicking and dragging the divider line up or down between circles and people. This allows you to create more space on either side of the line.

23. If you want to look at a lot of people at once on the Circles page, try pressing Ctrl and "-" a few times to zoom your browser out and make the content smaller. You can always press Ctrl and "0" to return to the normal view.

24. From the Circles page, double-click on any person to jump right to his or her profile.

25. Try this: On the Circles page, hover your mouse over a circle that has at least 30 people in it, then scroll with your mouse's scroll wheel. The faces in the circle will rotate around like a carousel, giving you a nice graphical way to see who's inside.

Google+ Tips Part 3: People and Profiles

26. Find new people by searching for topics or locations in the search box at the top of the Google+ page. You'll get back a list of people who have your keyword somewhere in their profile.

27. Search Google+ from Google by putting "site:plus.google.com" at the end of your query. To search only through posts you've written or shared, use "site:plus.google.com/[your Google ID]" -- replacing "[your Google ID]," of course, with your own unique Google ID (the long number that appears in the URL when you click on your profile).

40 Google+ Tips and Tricks for Power Users28. If you want to get really fancy, you can create special commands for searching Google+ within Chrome. Go into the "Manage search engines section" of your browser's settings and add a new entry called "Google+ Posts." Set the keyword as "post" and the URL as "{google:baseURL}search?q=site:plus.google.com inurl:posts/* %s." Add another new entry called "Google+ Profiles." Set its keyword as "profile" and its URL as "{google:baseURL}search?q=%s&tbs=prfl:e." Then, when you want to search through Google+ posts, just type "posts" followed by your query into the browser's location bar. To search Google+ profiles, type "profiles" followed by your keyword.

29. Jazz up your Google+ profile with a row of photos along the top of the page. Click the "Edit Profile" button on your profile page and then click on the large blank space beneath your name and short bio. There's plenty of room for creativity; check out this story at Mashable for some supercool examples.

30. You can edit photos right within Google+. Open any image from the "Photos" tab of your profile, then click the drop-down box labeled "Actions" and select "Edit photo." There, you'll find a variety of options for color and contrast correction as well as special effects.

31. All of your Google+ photos are actually stored in Picasa. You can see and share them from Google's Picasa Web Albums site.

32. Google+ makes it easy to see how your profile looks to other people. Just go to the "Profile and privacy" section of the Google+ settings and type any user's name into the box labeled "See how your profile appears to other users." Click "Preview," and you'll get a glimpse at yourself through someone else's eyes.

33. Get a permanent link to any Google+ post by clicking on its timestamp. If the post was shared publicly, this link will work for anyone -- even if they aren't signed into the Google+ service.

34. Expand your Google+ sharing options with the Extended Share extension for Chrome. It gives you added commands on every post to send the content to Twitter, Facebook, LinkedIn, or Tumblr.

35. Google+ doesn't officially offer RSS feeds yet, but you can make your own by adding your Google+ ID number to plusfeed.appspot.com. Mine, for example, would be http://plusfeed.appspot.com/108233028875375016776.

36. If you're jonesing to send your Google+ updates directly into other social networks, you can use your newly created RSS feed to do it. A service called Twitterfeed will take that feed and shoot it straight into your Twitter and/or Facebook account. (Just don't blame me when everyone on Twitter and Facebook starts unfollowing you.)

40 Google+ Tips and Tricks for Power Users37. Anytime you +1 a story on the Web, it'll show up in the "+1" tab of your Google+ profile, giving you an easy way to save favorites or stories you want to read later. The +1 Button Chrome extension puts the +1 button into your browser's URL bar so you always have easy access.

38. Ever find yourself browsing in another tab and constantly switching back to Google+ to look for new notifications? Install the G+ Count Chrome extension. It puts your current notification count in the front of your Google+ page title so you can always see it at a glance.

39. For even more robust G+ browser integration, give the Surplus Chrome extension a whirl. It adds a live Google+ notification count to the top of your browser; you can even click the button to access your notifications right there, without having to open Google+ at all.

40. Google doesn't yet offer a way to create a memorable URL for your Google+ profile, but some third-party services are stepping up to fill the gap. Try gplus.to; you give it your Google+ ID number and pick a nickname, and it gives you a short link that points directly to your page. Or, if you have your own domain and are comfortable messing with the .htaccess file, you can create a "yourdomain.com/+" redirect with a single line of code. Googler Daniel Sandler has posted detailed instructions, fittingly enough, on Google+.


READ MORE - Chimo NgeBlog : 40 Google+ Tips and Tricks for Power Users

Friday, July 22, 2011

Chimo NgeBlog : Mozilla's BrowserID Aims to Eliminate Password Fuss


About three weeks after releasing Firefox 5, Mozilla has rolled out a decentralized identity system called BrowserID that utilizes email addresses instead of usernames and passwords for identity authentication to grant access to secure Web sites and online services.

The system is based on a variant of the Verified Email Protocol, which is "a way for a user to prove to a website that they control an email address, through the web browser," according to VEP developer Mike Hanson.

Once a user has set up a BrowserID (a demo experience of this process is provided by Mozilla at Myfavoritebeer.org and a video tutorial is posted below), there's no more need to verify one's identify with per-site passwords when visiting Web sites or signing in to services that support the identification protocol.

The process is secure, according to Mozilla, because "sites get proof of ownership using public key cryptography." And Mozilla has its own verification service, "so you can get started without writing a single line of crypto code."

BrowserID is also browser-neutral, meaning it works not just with Firefox, but "on all modern browsers." Mozilla specifically identifies "recent versions" of Microsoft's Internet Explorer as compatible with BrowserID, as well as unnamed "mobile browsers."

So how does it work and how secure is it really?

Lloyd Hilaiel has written a technical primer on BrowserID, in which he identifies key design features that make it easy for users to grasp, more secure for users because it doesn't allow for weak passwords or easily socially engineerable ones, and better at protecting users' privacy than other authentication systems.

The first nice thing about BrowserID is that it makes a user's email address their identity, which is a natural fit because "[u]sers identify with emails quite naturally, and no new infrastructure is needed to reliably verify ownership of them."

Another benefit for users of BrowserID is that logging-in to secure sites has a one-click, streamlined feel to it that's consistent across all the sites utilizing the protocol.

Next, by design, BrowserID doesn't involve identify providers in the login transaction. That means third parties don't need to be made aware of a BrowserID owner's outside Web activity, "a significant privacy advantage," according to Hilaiel.

Finally, BrowserID utilizes ownership-based authentication, meaning that the browser manages authentication material in such a way that is less reliant than other systems on "knowledge factors"—like a user's birthday or other typical personal information people use for passwords, which can be sniffed out by potential identity thieves.

So what's not to like about BrowserID? Probably the fact that it pretty much only works on Myfavoritebeer.org and a few early adopting Web sites so far. Until the protocol gains a bigger footprint across lots of popular Web destinations, it's just another identity verification process to go through without a lot of return for your time.

Mozilla, unsurprisingly, is strongly encouraging developers to add BrowserID functionality to their sites.

READ MORE - Chimo NgeBlog : Mozilla's BrowserID Aims to Eliminate Password Fuss

Chimo NgeBlog : Top 10 Ways to Speed Up Your Computer’s Boot Time

If there's one thing everyone dreads, it's rebooting their computer. It may only take a minute or two, but it can seem like forever. Here are our top 10 tweaks that'll make your computer boot a little faster.

This is a pretty controversial topic, as there are a lot of startup-tweaking myths out there. So, we took to the streets (of the internet) and searched for as many easy, well-supported tips as we could find. There may be others, some of which are controversial, but these 10 things are almost sure to get you a faster-booting machine.

10. Tweak Your BIOS

Top 10 Ways to Speed Up Your Computer's Boot TimeWhen you first set up your computer, your BIOS is set up to make things a bit more convenient for you, but once you're all set up, those things can be disabled. If you hold the DEL key when you start up your computer (or whatever key your BIOS tells you to enter setup), you can turn on the "Quick Boot" option and move your hard disk to the top of the boot priority list. The Quick Boot setting will turn off the tests your computer runs when it first turns on, and the boot priority tweak will tell your computer not to look for CDs, thumb drives, or other media when it first starts, which will get you booted into your OS quicker. If you ever need to boot from CD though, you'll have to go back into the BIOS and change this again before you do.

9. Clean Out Programs that Launch at Startup

Top 10 Ways to Speed Up Your Computer's Boot TimeOne of the most tried and true ways to speed up your boot process is to keep unnecessary programs from starting up with your computer. You can do this by running msconfig from the Start Menu's search box, and going to the Startup tab. This applications list will tell you what each of those applications does, so you know which ones you can disable and which ones you don't want to. Previously mentioned Soluto is also a fantastic way to clean up these programs, and these days it's got a bunch of other handy features that make it worth a download.

8. Delay Windows Services That Run at Startup

Many people argue that disabling Services from msconfig will also speed up your boot time, but we've found that this is more problematic than anything. However, you can delay certain startup services so that your computer boots quickly and then worries about them later—after all, you don't need all those services the minute you start up your machine.

7. Change Your Boot Menu's Timeout Values

If you're dual-booting your machine, then your boot menu probably has a "timeout value", meaning the amount of time it waits for you to make a selection before it just boots into the default OS. On Windows, this timeout value is often 30 seconds, which is a long time to wait if you aren't looking directly at your screen. To change this timeout value, head to msconfig and click on the BOOT.INI tab, and change the number in the timeout box to something lower. If you're dual-booting with Linux, you're probably running the GRUB boot menu, and you can change the timeout on that too.

6. Disable Unused Hardware

Your computer loads a lot of drivers when it first starts up, some of which you might not even use. Head into the Device Manager from the Start Menu's search box, and look for anything you aren't using—Bluetooth controllers, modems, and virtual Wi-Fi adapters are common culprits. Right-click on the entry you want to disable and hit "Disable". Remember to only do this with things you don't actually use—if you use Wireless Hosted Networks, you'll need to keep those virtual Wi-Fi adapters enabled. It's also worth mentioning here that keeping all your drivers up to date will help this portion of the startup time, too (which you can do with the help of a program like previously mentioned Device Doctor).

5. Keep Your Antivirus Running and Up to Date

Top 10 Ways to Speed Up Your Computer's Boot TimeThis should go without saying, but we'll say it anyway: install some antivirus software, keep it up to date, and run a regular scan. This is more of a preventative measure than an actual boot-speeding tip, but if you ever do get malware, it's sure to slow your computer's boot time. With a good antivirus around like Microsoft Security Essentials, you'll be more protected against that happening. Don't like MSE? There are some great ones out there too, so there's no reason not to have one around.

4. Remove Unnecessary Fonts

Top 10 Ways to Speed Up Your Computer's Boot TimeSince the dawn of time, Windows has loaded fonts at startup and slowed down the boot time. This is less of a problem than it used to be, but it can still slow you down a bit. Windows 7 loads over 200 fonts at startup; even more if you've installed Microsoft Office. Chances are, you use very few of those fonts, so you can hide them to speed up that process. In Windows 7, open up the Fonts folder from the Start Menu's search box, and check off all the fonts you don't need. Then click the "Hide" button in the toolbar. This way, if you ever want them, you can bring them back, but Windows won't load them at startup. Note that just removing a few fonts probably isn't going to make a noticeable difference—you'll probably need to get rid of a few hundred. That said, you might have hundreds more fonts installed than you realized, so that isn't as ridiculous as it sounds.

3. Upgrade Your RAM

Top 10 Ways to Speed Up Your Computer's Boot TimeInstalling more RAM has always been an effective way of speeding up your computer, and that hasn't changed. RAM is pretty cheap these days, so if you're running low, there's no reason not to stock up and make your computer run a little smoother. We've gone over how to replace it in both a desktop and a laptop, and even for the inexperienced, it's a pretty simple procedure.

2. Give Your Computer a Static IP

When you first start up your computer, it spends a significant amount of time asking the network for an IP address. You can get rid of this process altogether by giving your computer a static IP address that never changes. Not only does this make your network easier to manage (since each computer will always have the same IP address), but it can shave a bit more time off your startup. Here's how to do it in different versions of Windows.

1. Install a Solid State Drive

These days, your hard drive is probably the biggest bottleneck in your machine. One of the best upgrades you can make to your computer is to install a solid state drive, which has super-fast read times that can speed up your startup considerably. They're certainly not a cheap upgrade, nor are they without their own maintenance requirements, but if you want to speed up your computer and its boot time, you can't go wrong by installing an SSD. The difference will be shocking.

Again, these aren't the only ways to shorten your computer's boot time, but they are some of the most well-known, trusted methods that we've found. If you have any of your own favorite tweaks, share them with us in the comments, but beware of myths and snake oil—there are a lot of tweaks out there that do more harm than good.


READ MORE - Chimo NgeBlog : Top 10 Ways to Speed Up Your Computer’s Boot Time

Tuesday, July 19, 2011

Chimo NgeBlog : WordPress Toolbar For Firefox

WordPress is displaying an admin bar since version 3.1 release that administrators can use to access the blog’s backend when they are on the frontend. The bar displays options to add new contents, edit the current page, open the dashboard, comment moderation or appearance settings of the blog.

I personally dislike the new WordPress admin bar for several reasons. First, it always takes up space at the top of the browser window, which means that the start of the website is pushed down a bit. The admin bar furthermore does not link to all available sections of the WordPress admin interface. If you want to manage plugins for instance, you end up with the same amount of clicks than before.

The WordPress Toolbar is a Firefox extension that resolves those two issues, at least for Firefox users. Unlike traditional toolbars, this one does not add itself to the header area of the browser, which is a good decision. The extension adds a single icon to the Firefox status bar after installation.

A click on the button has no effect on most sites. It only works on WordPress powered sites and only if the user is currently logged in as a user of that site.

When that is the case, a button toolbar is displayed in the upper right corner of the page. This toolbar is displayed both on the frontend and backend of the blog.

wordpress toolbar

The toolbar replicates the full WordPress admin backend sans custom theme related sections. The main buttons lead directly to the sections in the backend. If you mouse over a button you see all available submenu options listed there, so that you can open those pages right away as well.

All options are basically links that point to the section in the admin backend. While that may not be the most comfortable way of integrating the backend in the WordPress frontend, it resolves the issues of the admin bar. WordPress Toolbar links to all sections of the admin interface, plus it does not push down the page with its always visible bar.

Most WordPress administrators may not like the fact that the button in the status bar needs to be clicked on before the toolbar is displayed in the upper right corner. This means that it requires two or three clicks to load the desired admin page. Even worse, admins need to click on the status bar icon at the bottom of the browser screen and then on a button near the top of the screen. It is possible to customize the button to place it in one of the top toolbars of the browser instead to reduce the time it takes to activate the feature.

WordPress administrators who would like to give the toolbar a try can download the extension from the official Mozilla Firefox website.


READ MORE - Chimo NgeBlog : WordPress Toolbar For Firefox

Monday, July 18, 2011

Chimo NgeBlog : Five of the best system rescue tools


Most malware doesn't intentionally set out to damage your PC, that's bad for business - the authors want their creations to stay hidden, so your system remains infected for as long as possible. But whether it's through programming bugs, partial clashes with antivirus software or other reasons, a serious infection can sometimes trash your PC to the point where Windows will no longer boot. And what do you do then?

Fear not. Here are five free downloads that will allow you to create CDs or USB drives that you can boot your system from as well as letting you locate and remove the malware.

Paragon Rescue Kit 11 Free Edition

Paragon Rescue Kit 11 Free Edition is a professional disaster recovery toolkit that could be all you need to get an unbootable PC working again. The software comes in the form of an ISO file, which the setup program will burn to CD or DVD. Boot your PC from this instead and you'll launch a collection of essential troubleshooting tools.

Norton Bootable Recovery Tool 3.5

Download the Norton Bootable Recovery Tool Wizard via another system, and it'll quickly create a CD, DVD or USB flash drive containing stand-alone Norton antivirus tools. Boot your stricken PC from this, and it'll scan for infections, attempt to remove them and repair any damage, and your system could be back in working order in just a few minutes.

AVG Rescue CD v100.110314a3732

The AVG Rescue CD is a bootable ISO image that comes with a range of tools to help you clean up a virus-infected PC, fix hard drive problems, and get an unbootable system working again.

Burn the disc to a CD, boot from it, and the integrated antivirus engine will attempt to update itself over the internet, or using a local folder. You can then run a full system scan to check for threats. And as any infection won't be active (because you've booted from the CD, not your PC), it won't be able to interfere or hide from the scan, and the chances of a successful cleanup are correspondingly much higher.

Avira AntiVir Rescue System 2011.07.01

Avira AntiVir Rescue System is a Linux-based boot disc that will detect and remove malware from a damaged PC. Booting from a separate CD means that stealthy malware like rootkits will find it more difficult to hide, and you'll have a much better chance of detecting and removing them.

System Rescue CD 2.1.1

System Rescue CD is a mini-Linux distribution on a CD that can be used to recover or repair a broken system. Although it is a Linux system, it can be used to repair Windows computers too, and includes a number of tools specifically for this purpose.

READ MORE - Chimo NgeBlog : Five of the best system rescue tools

Sunday, July 17, 2011

Chimo NgeBlog ; GMER - Automating Rootkit Analyzer Released


GMER is an application that detects and removes rootkits .
It scans for:

  • hidden processes

  • hidden threads

  • hidden modules

  • hidden services

  • hidden files

  • hidden disk sectors (MBR)

  • hidden Alternate Data Streams

  • hidden registry keys

  • drivers hooking SSDT

  • drivers hooking IDT

  • drivers hooking IRP calls

  • inline hooks


  • You can download GMER here.
    READ MORE - Chimo NgeBlog ; GMER - Automating Rootkit Analyzer Released

    Chimo NgeBlog : How to enable JavaScript in Apple Safari

    JavaScript is a programming language that allows websites to offer sounds as well as interactive menus and other features. To ensure these facilities are available when you surf the web, you'll need to enable JavaScript on your browser. We've already show you how to do it in Firefox 5, Internet Explorer 9 and Google Chrome but it's slightly different to implement in Apple Safari. Here's how.

    Step one
    Open Safari, and then using the icon that looks like a cog, open the settings menu and Select Preferences.

    Step two
    Select the tab marked 'Security' and under the Web Content section ensure the box next to Enable JavaScript is ticked.

    Step three
    Alternatively to disable JavaScript, untick the box. Then press the cross in the top right-hand corner to close the Preferences pop-up and continue browsing.

    READ MORE - Chimo NgeBlog : How to enable JavaScript in Apple Safari

    Saturday, July 16, 2011

    Chimo NgeBlog : Make your own 3D models with Google Sketchup


    Computer-based design work doesn't have to be limited to two dimensions for paper or screen presentations. Google Sketchup is a 3D model designer that can be used for all kinds of design work with close links to Google Earth.

    Installation is easy. There is an option to install the Google Toolbar for Internet Explorer.

    The welcome screen when Sketchup starts for the first time has lots of useful information including links to video tutorials, tips and tricks, the Sketchup blog and, rather impressively, printing a quick reference card.

    There are several templates to choose from and measurements can be in either imperial or metric.

    Version 8 includes new tools for working with Google Earth. The Add location tool opens a Google Maps window to import more detailed 3D terrain data and colour images.

    The Building Maker can use images from aerial photography to make buildings based on photo that can be imported into Sketchup. It is also possible to import buildings from other people. Photo-based textures for buildings can be imported from Google Streetview.

    READ MORE - Chimo NgeBlog : Make your own 3D models with Google Sketchup

    Friday, July 15, 2011

    Chimo NgeBlog : 5 Cool Add Ons for Firefox 5


    I was just getting used to the excellent version 4 of Mozilla's Firefox browser when those wild and crazy coders rolled out version 5 after just three months.

    Version 4 was a huge leap forward from 3.6 and when it came out, I recommended it for its many new features, particularly the way it allows users to group tabs. Version 5 doesn't break a lot of new ground from the user's point of view, but it's solid and has some good stuff under the hood to make it more stable and developer friendly.

    Like other versions of Firefox, many of the best goodies are contained in add ons, little programs that run within your browser. One problem with releasing versions so quickly is that it will take a while for developers of the add ons to make whatever changes are necessary for their apps to be compatible with the new browser.

    Not all add ons that worked with 4 will work with 5, though many will and even more will work again in the future. For now, I've tested a number of my favorite add ons (plus some new ones) and picked five that will work on Firefox 5 as well as Firefox 4. All of these add ons are free.

    If you install an add on and decide you don't want to keep it, uninstalling it is easy. Simply go to "tools" then "add ons" and then look for an icon labeled "extensions." When you click it, you'll see a list of your add ons and you can disable or remove them from there.

    Google Shortcuts

    Even though I tend to use Firefox rather than Chrome these days, that doesn't mean I don't use Google services. In fact, I use quite a few. I really like this handy little add on. You can use it to display any of the dozens of Google services as buttons or as a space-saving dropdown menu next to your address bar. There are so many services to choose from in the settings menu box that you'll probably learn about some you'd never heard of.

    Adblock Plus

    I'm not the worst dressed guy in town, but Gucci? I don't think so. So I wasn't sorry to see the Gucci ad at the top of the New York Times page disappear after I installed Adblock Plus.

    This little add on doesn't do anything until you customize it. It can see everything a Web page attempts to load but it doesn't know whether this attempt should be blocked. That's when you need filters -- filters will tell Adblock Plus what should be blocked. Usually, you won't create filters yourself. Instead you will add a filter subscription that is maintained by somebody else. If there's a page with ads you'd like to see, you can set Adblock Plus not to function on that page.

    In addition to blocking ads, Adblock Plus actually speeds up your browsing since you won't have to wait for ads that load separately from the page.

    LastPass

    LastPass is a handy password manager and form filler. Your passwords are kept in a "vault" online, which means they'll work across multiple browsers and computers. It makes it much easier to add security to your online life since you don't have to write your passwords down, or use the same one over and over again.

    However, LastPass did suffer a data breach earlier this year. I was impressed with how well the company handled it, notifying users immediately and urging everyone to change their passwords. To my knowledge, no actual user data was lost. I have not stopped using it, but I keep an eye on all of my online accounts for unauthorized activity, which is something you should do whether you use as a password manager or not. My other favorite password manager, Roboform, doesn't yet work well with Firefox 5, though it is supported by Firefox 4.


    Cooliris

    This is an eye-candy app; not super useful but quite cool. Use it to get an innovative 3D view of photos or videos on the Web. It's the first 3D browser tool I've seen that doesn't have an impossibly complicated interface. It creates a wall of visual content you can sail by, stopping to play a video or zoom in on a photo. It's handy if you do a search on Google or Bing images and get lots of hits.

    Cooliris works well on YouTube and a bunch of photo-sharing sites including Flickr, Picassa Web, and others, and integrates with Facebook and MySpace (if anyone still cares about MySpace). It won't work well on an older machine, but if your PC can handle Windows Vista or Windows 7, you'll be fine. There are also versions for the iPhone and iPad, but I haven't tried them yet.

    Maybe I shouldn't include an add on that will help you waste time, but hey, who am I to judge? Asteroids Bookmarklet temporarily turns any Web site into an asteroids screen. Your cursor turns big, and just like you could in the original, vintage game, you move the enlarged cursor around with arrow keys and fire a laser cannon with the spacebar, and KaBoom -- you blow up annoying parts of the page.

    You don't even have to install it; simply drag the icon to your bookmarks bar, click on it, and you're ready to play -- it's just a bit of JavaScript. When you need the page back, just refresh and it's back to work.

    READ MORE - Chimo NgeBlog : 5 Cool Add Ons for Firefox 5

    Thursday, July 14, 2011

    Chimo NgeBlog : 13 tips for keeping your passwords secure


    If there's one lesson to be learned from the rash of hack attacks recently, it's the value of a strong password.

    Hacker group LulzSec - after hacking into the websites of the CIA, PBS and Sony - posted on the Internet the email addresses and passwords of 62,000 compromised accounts.

    A quick scan of the list showed that most passwords were easy to remember - and easy to crack. Sample: "wildwoman," "coffeecup," "peterp," and "kindle."

    Of course, the ideal password would be long, unintelligible and nearly impossible to predict. Like this: !co4D4)f%d. But good passwords are hard to remember, which is why so many people end up with easy ones or reuse the same password for multiple accounts.

    Nowadays, passwords are the keys to your digital life, and they safeguard everything from your email accounts to your bank accounts against cyber criminals. Some ways to protect yourself online:

    Use mnemonics. Pick a personal sentence, as I did for my college account: "I am an NYU student!" and take the first letter of every word to create a password "1iaanyus!" (NYU requires its students to add a number for extra security. And no, that password doesn't work anymore.)

    Know that longer is usually better, but not always. A six-character password such as 7cG&!s is more secure than a longer password that uses a word or a phrase, such as iloveyou.

    Change passwords to your bank accounts every few months.

    Write down the passwords on a list without user names. Keep it with your passport, car title, Social Security card or other papers you are not likely to lose.

    If you can't remember passwords and tend to lose scraps of paper, use password-managing software such as LastPass or KeePass that encrypts and stores all your passwords. Some will automatically plug in your password at the appropriate sites. They're usually free or charge a nominal monthly fee for extra features.

    If you want the ultimate protection, consider using a "random password generator" that you can find by doing an Internet search. It'll spit out passwords depending on how complicated you want them to be.

    And a few things to avoid:

    Never use simple words or phrases, even if you spell them backward and add a number. Hackers have software that can predict commonly used words.

    Never have the same password for every account, especially for bank accounts and sites such as Amazon that can store your credit card information.

    Never email passwords to yourself. If hackers gain access to your email, they then have everything.

    Avoid using personal details. Do not include your name, birthday or home address, which can be easily guessed by someone who knows you.

    Don't share your passwords with friends or family.

    Don't log into sensitive accounts when using public Wi-Fi.

    Remember that no password is completely immune from being cracked, said Robert Rachwald, the director of security strategy at Redwood Shores, Calif., digital security firm Imperva.

    The best way to keep your personal information safe is to avoid providing it if at all possible.


    READ MORE - Chimo NgeBlog : 13 tips for keeping your passwords secure

    Wednesday, July 13, 2011

    Chimo NgeBlog : How to enable cookies in Internet Explorer 9

    When surfing the net, websites will leave little bits of information, known as cookies, stored on your PC. These cookies allow your browser to remember your login details or site preferences. It's very easy to enable and disable them. We've already shown you how to do it in Firefox 5, but it's slightly different to implement in Internet Explorer 9. Here's how.

    Step one
    From the Tools menu located at the top right-hand corner of the browser window, select Internet options.

    Step two
    Click on the Privacy tab and then press Advanced.

    Step three
    Check the box under Override automatic cookie handling and then make sure Accept is selected for both First-party cookies and Third-party cookies. Press OK to apply the changes.

    Step four
    If you want to disable cookies, simply select the block option rather than Accept.

    READ MORE - Chimo NgeBlog : How to enable cookies in Internet Explorer 9