Implemented in Qt and using up a fair amount of RAM, ShutterPro Premium gets off to a bad start by taking a whopping 12 seconds from tapping its icon to being ready to take a basic shot. Add another five seconds or so if you want to scroll to and apply an effect. With a little setup as well, you can easily take up to thirty seconds to get your first proper photo - let's hope the subject isn't a person or animal, else it will long since have moved on.
But I'm being a little unfair - ShutterPro Premium's aim is to provide interesting effects and tools for those who want to take their camera phone photography in a new direction - and who have the patience and time available for a not inconsiderable degree of trial and error.
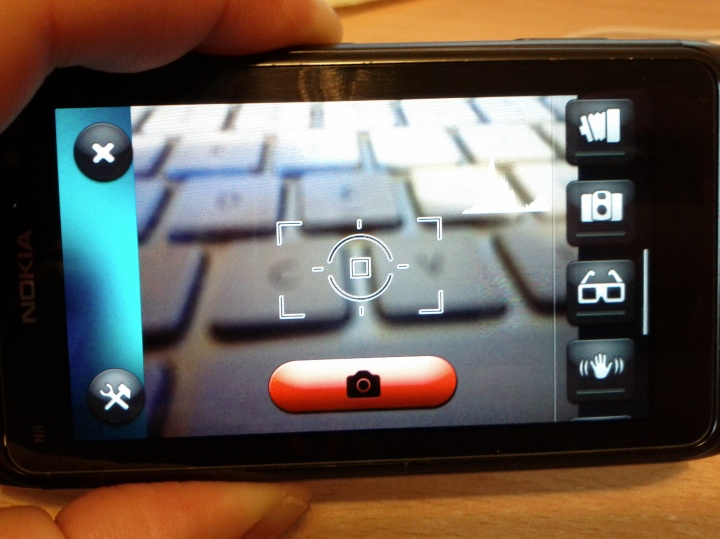
The interface is clear enough and quite well thought out - a shortcuts bar down the right containing every major function, remeniscent of the S60 camera interface from the N95 era, with mock LEDs where needed to indicate which function is on or off. Some are mutually exclusive, some can be turned on in combination.
Each function can be configured through a 'tools' icon at bottom left, I'll list those available below. Although a big red shutter button is presented on-screen, the hardware shutter button on the phone is also recognised, so you've effectively got a choice of which to use.
Top marks then so far for ease of use and an intuitive interface. Working through the camera functions, we have:
- Exposure (variable up or down 2 stops in 0.3 stop intervals)
- Flash (as you'd expect: auto, on, off, anti-red eye)
- Program (like 'scenes' in the regular Camera interface)
- White balance (again, as per Camera's options)
- Iso (again, as per Camera)
- Face recognition (again, as per Camera)
- Histogram (turns on overall or RGB real time histograms of the image currently in the viewfinder - not that useful to amateurs, but fun to see in action, and shows what the graphics chip inside these new phones can do)
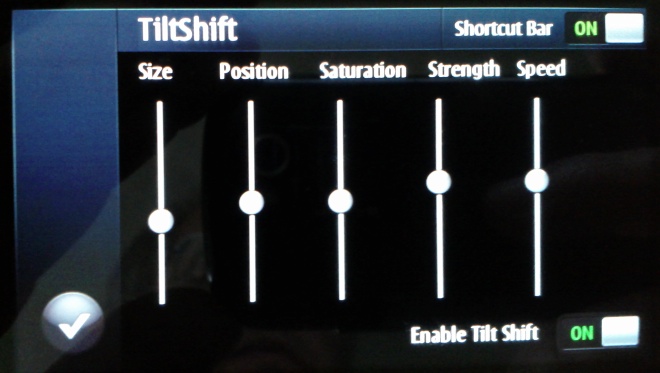
- Tilt shift (crudely simulates the famous 'make a scene look like a miniature' photographic effect by blurring the top and bottom of the image, with variable results, as we'll see later)
- LOMO (simulates a well known photographic effect originating with cheap Russian cameras. It's a nice effect, but not that usable in real life)
- Anaglyph (helps you produce red and green images that can be combined into a 3D image for someone wearing the special/famous glasses)
- HDR (High Dynamic Range, several photos are taken and - in theory - digitally combined into one image that has high contrast in both areas of bright and dark detail. In practice, it didn't work very well, for me)
- Antishake (as it sounds, presumably using the accelerometer to take a snap when the phone is at its stillest)
- Delay (as per the built-in Camera application)
- Cannon (in theory, a 'burst' mode, for capturing quick fire sequences of photos. In practice, at only one per second at best, there's not that much benefit - burst mode needs to be down below half a second per shot if it's to be of any real use)
- Monochrome (as it sounds)
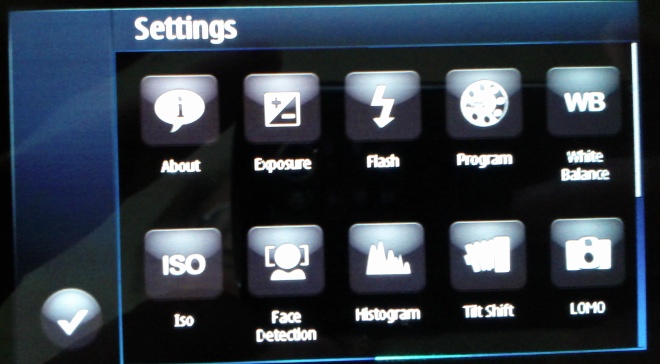
In each case there's a complementary settings panel to tweak the parameters, as needed.
A long list above, but taking away the functions which are all implemented in Camera, we're essentially left with a much smaller bunch of special effects - so let's try them out. In each case below, click on the photo to download the original or enlarge more in your browser (as appropriate):
Tilt shift
From Wikipedia:
"Tilt-shift photography" refers to the use of camera movements on small- and medium-format cameras, and sometimes specifically refers to the use of tilt for selective focus, often for simulating a miniature scene. Sometimes the term is used when the shallow depth of field is simulated with digital postprocessing; the name may derive from the tilt-shift lens normally required when the effect is produced optically.
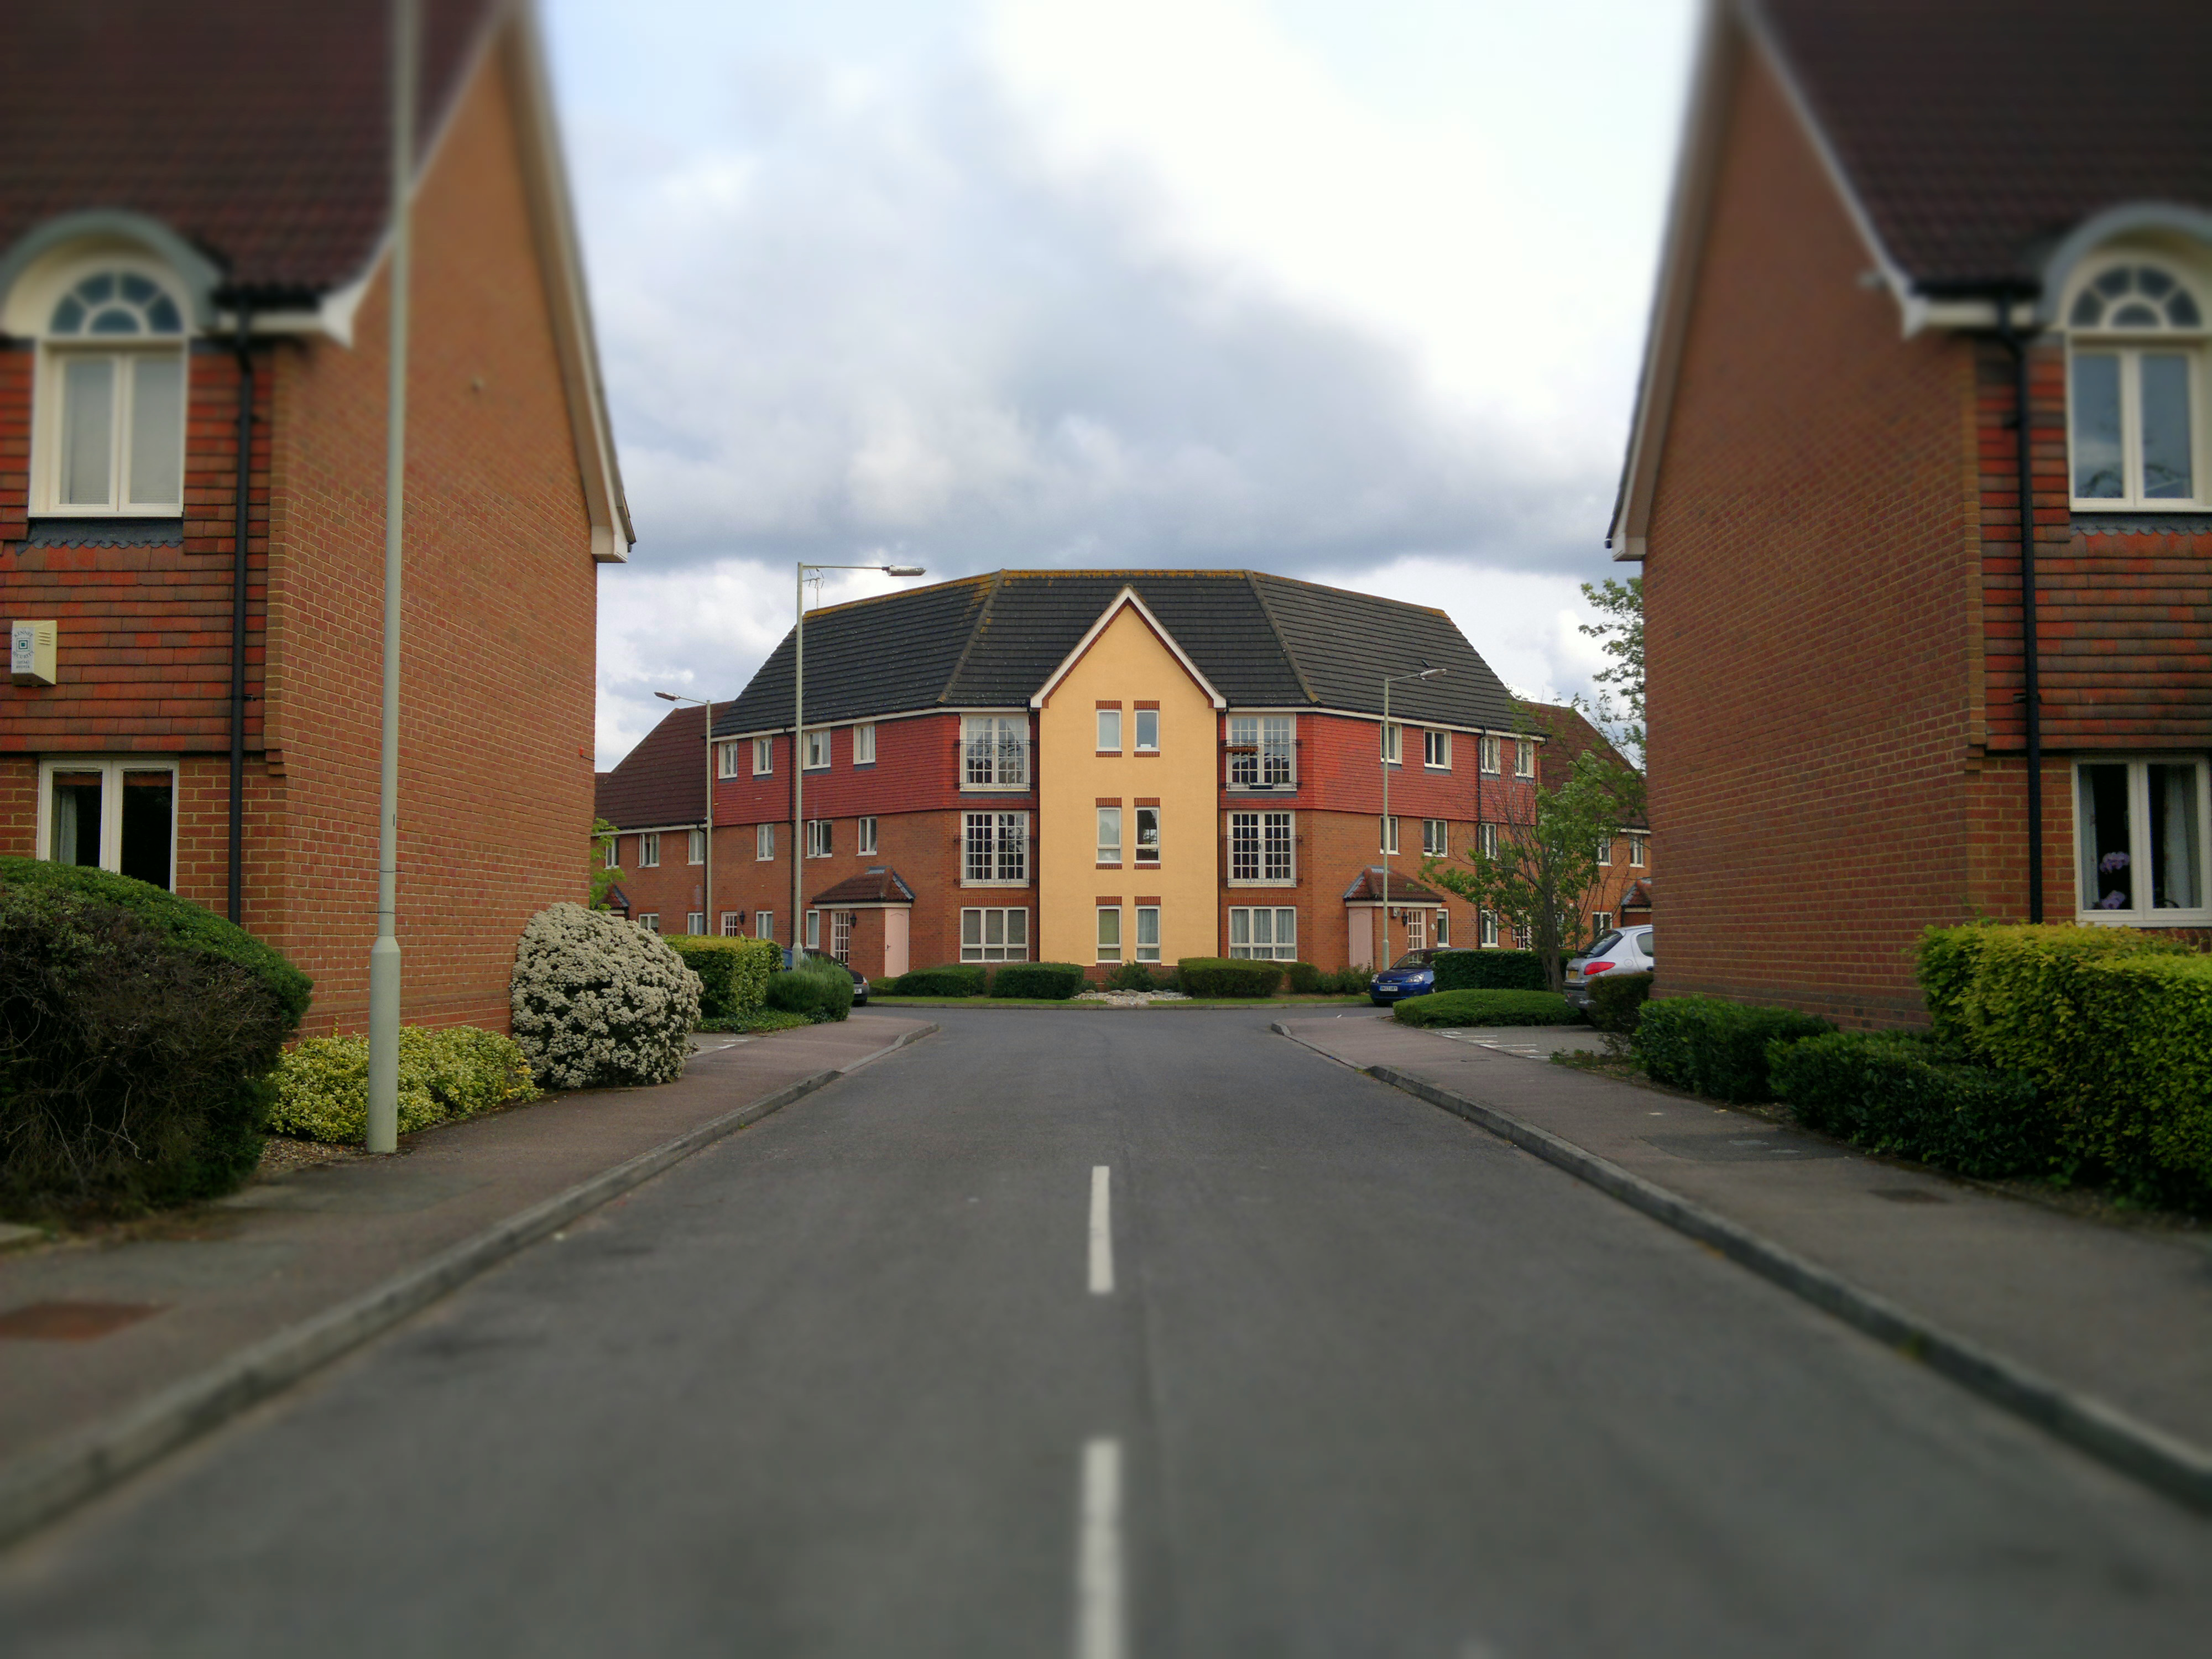
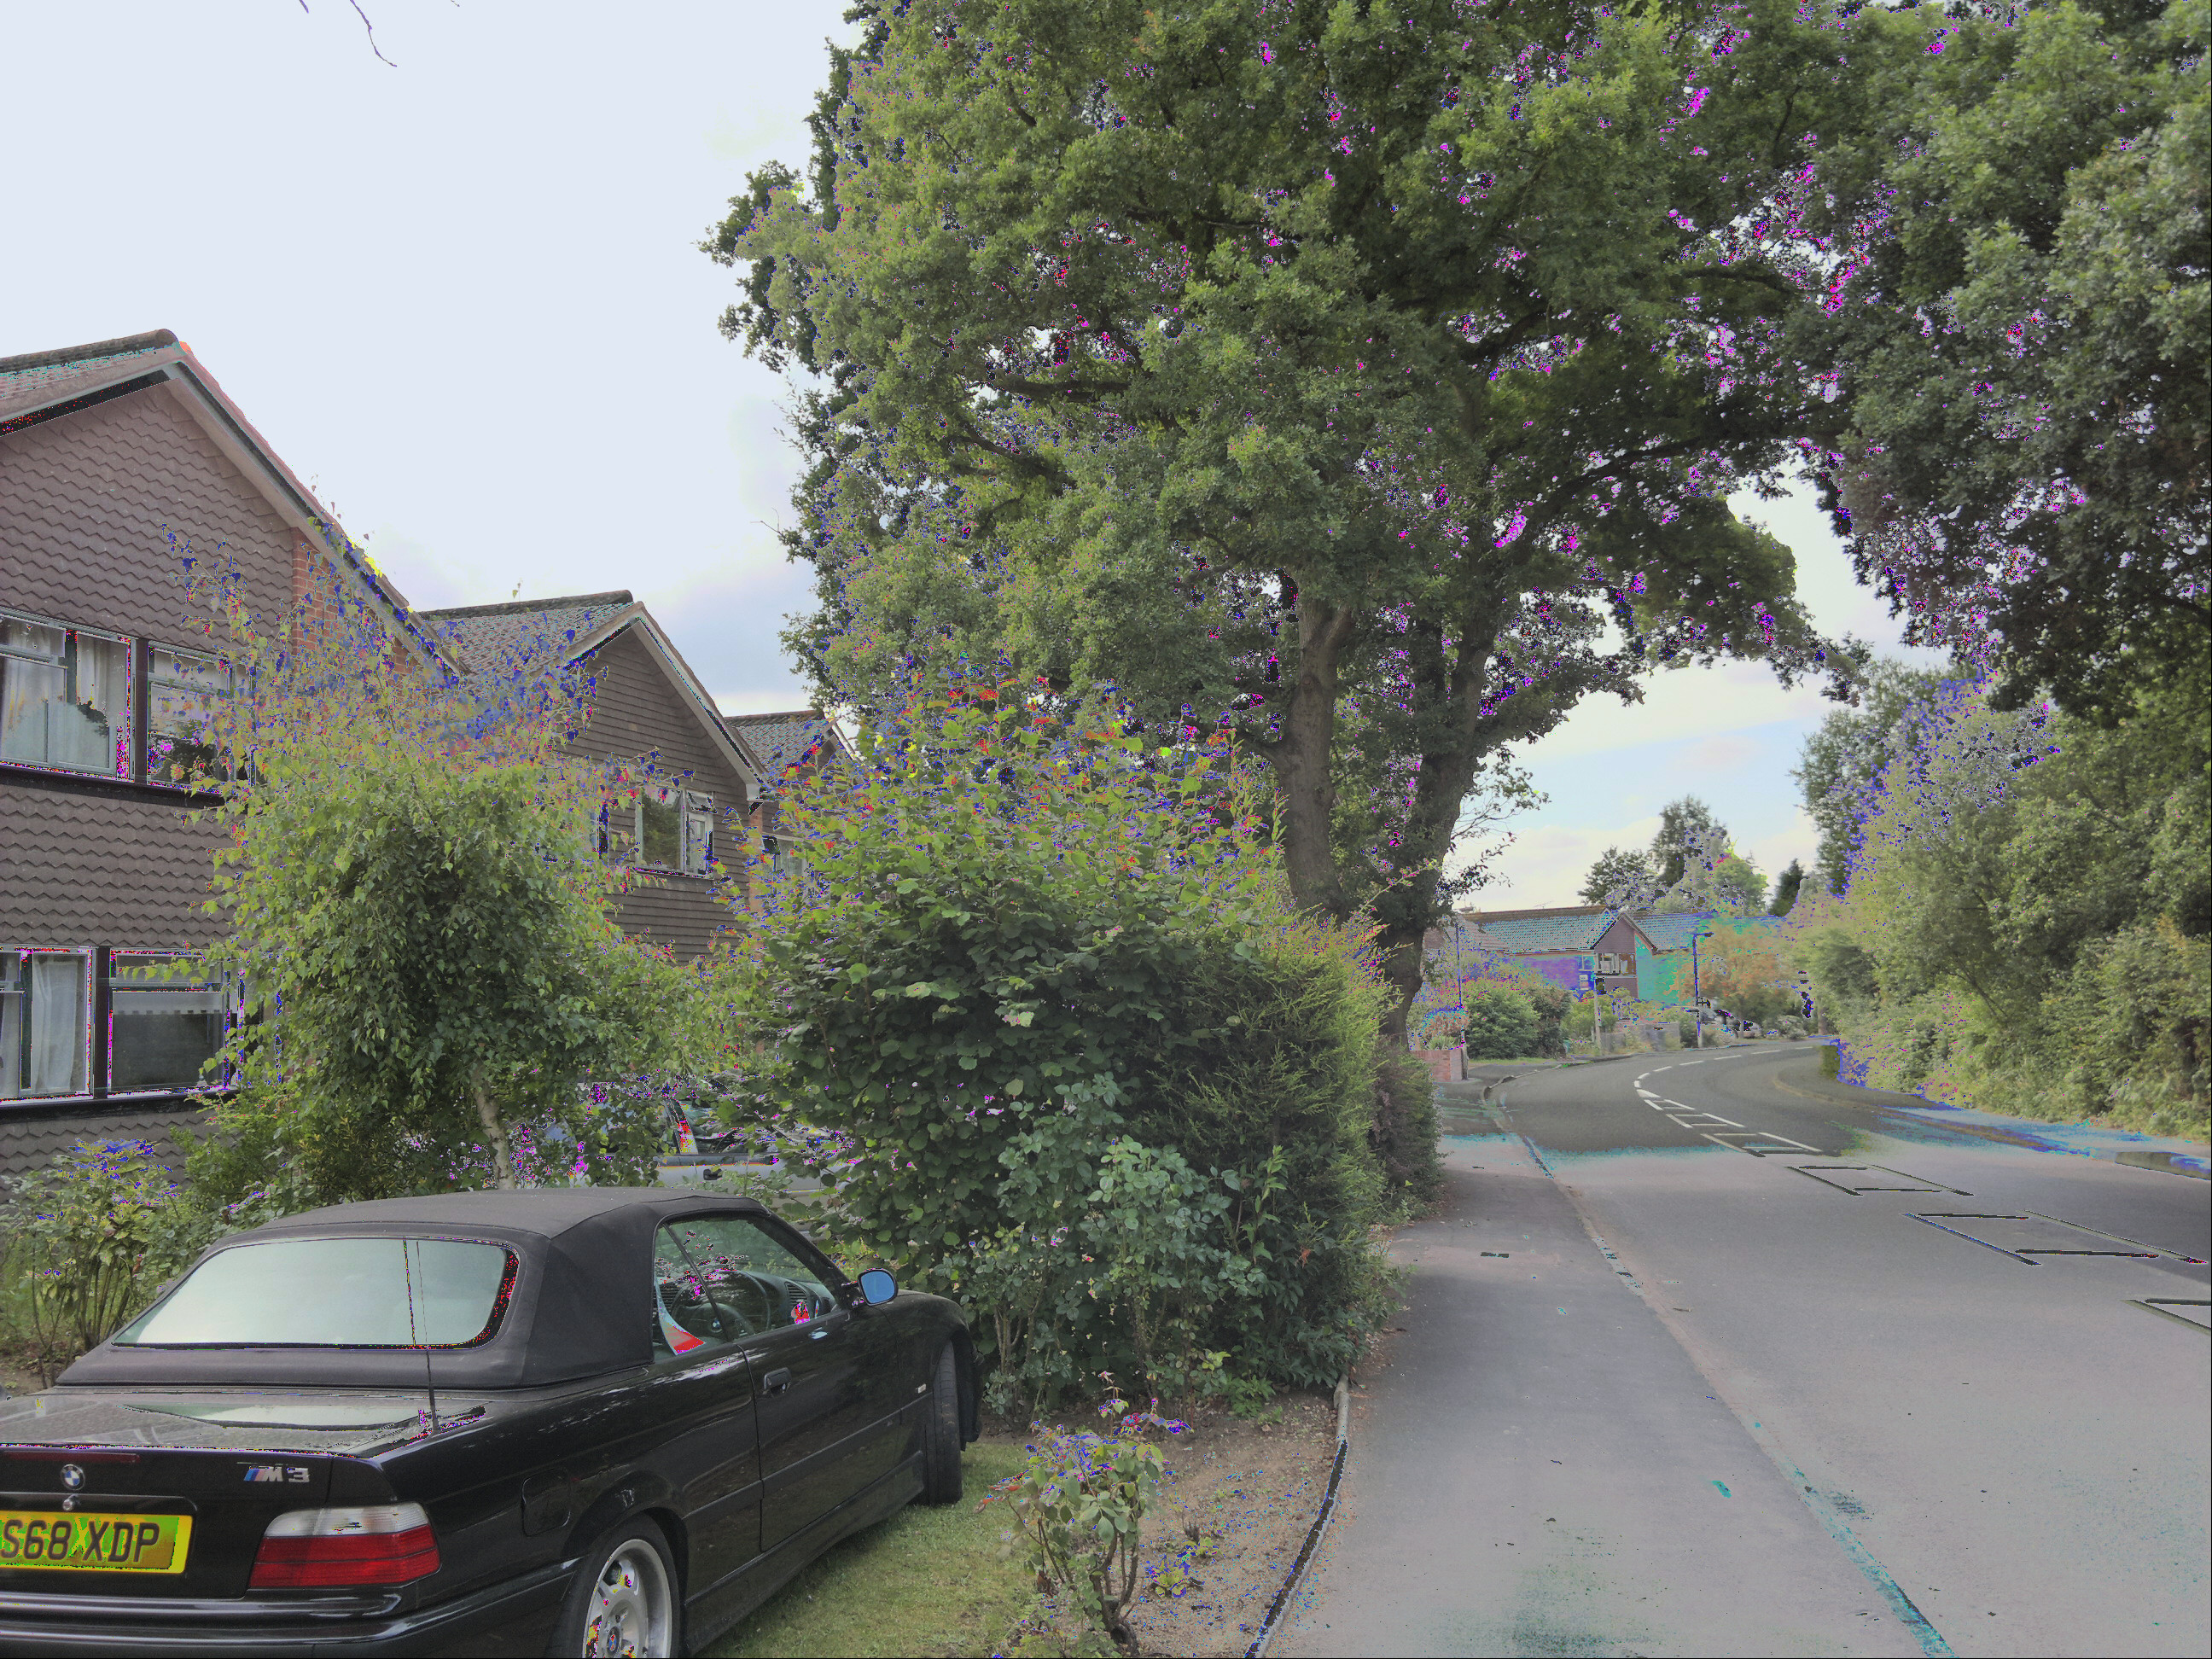
What's not covered by the definition is that for the effect to be appropriate or useful, you have to pick exactly the right subject with exactly the right combination of surroundings, foreground and background. For example, here's a random street scene, snapped with ShutterPro's 'Tilt Shift' - the house in the middle looks a little bit artificial, but the vertical surroundings ruin any effect:
What's needed is a subject in the centre of frame that needs downsizing, with no tell tale clues either side of it, plus detail in the bottom third of the frame (i.e. foreground) and also in the top third (background). Trains are an ideal subject, especially because they're often found as toys or models, making a miniature scene believable. Here's my second attempt, shooting off a bridge:
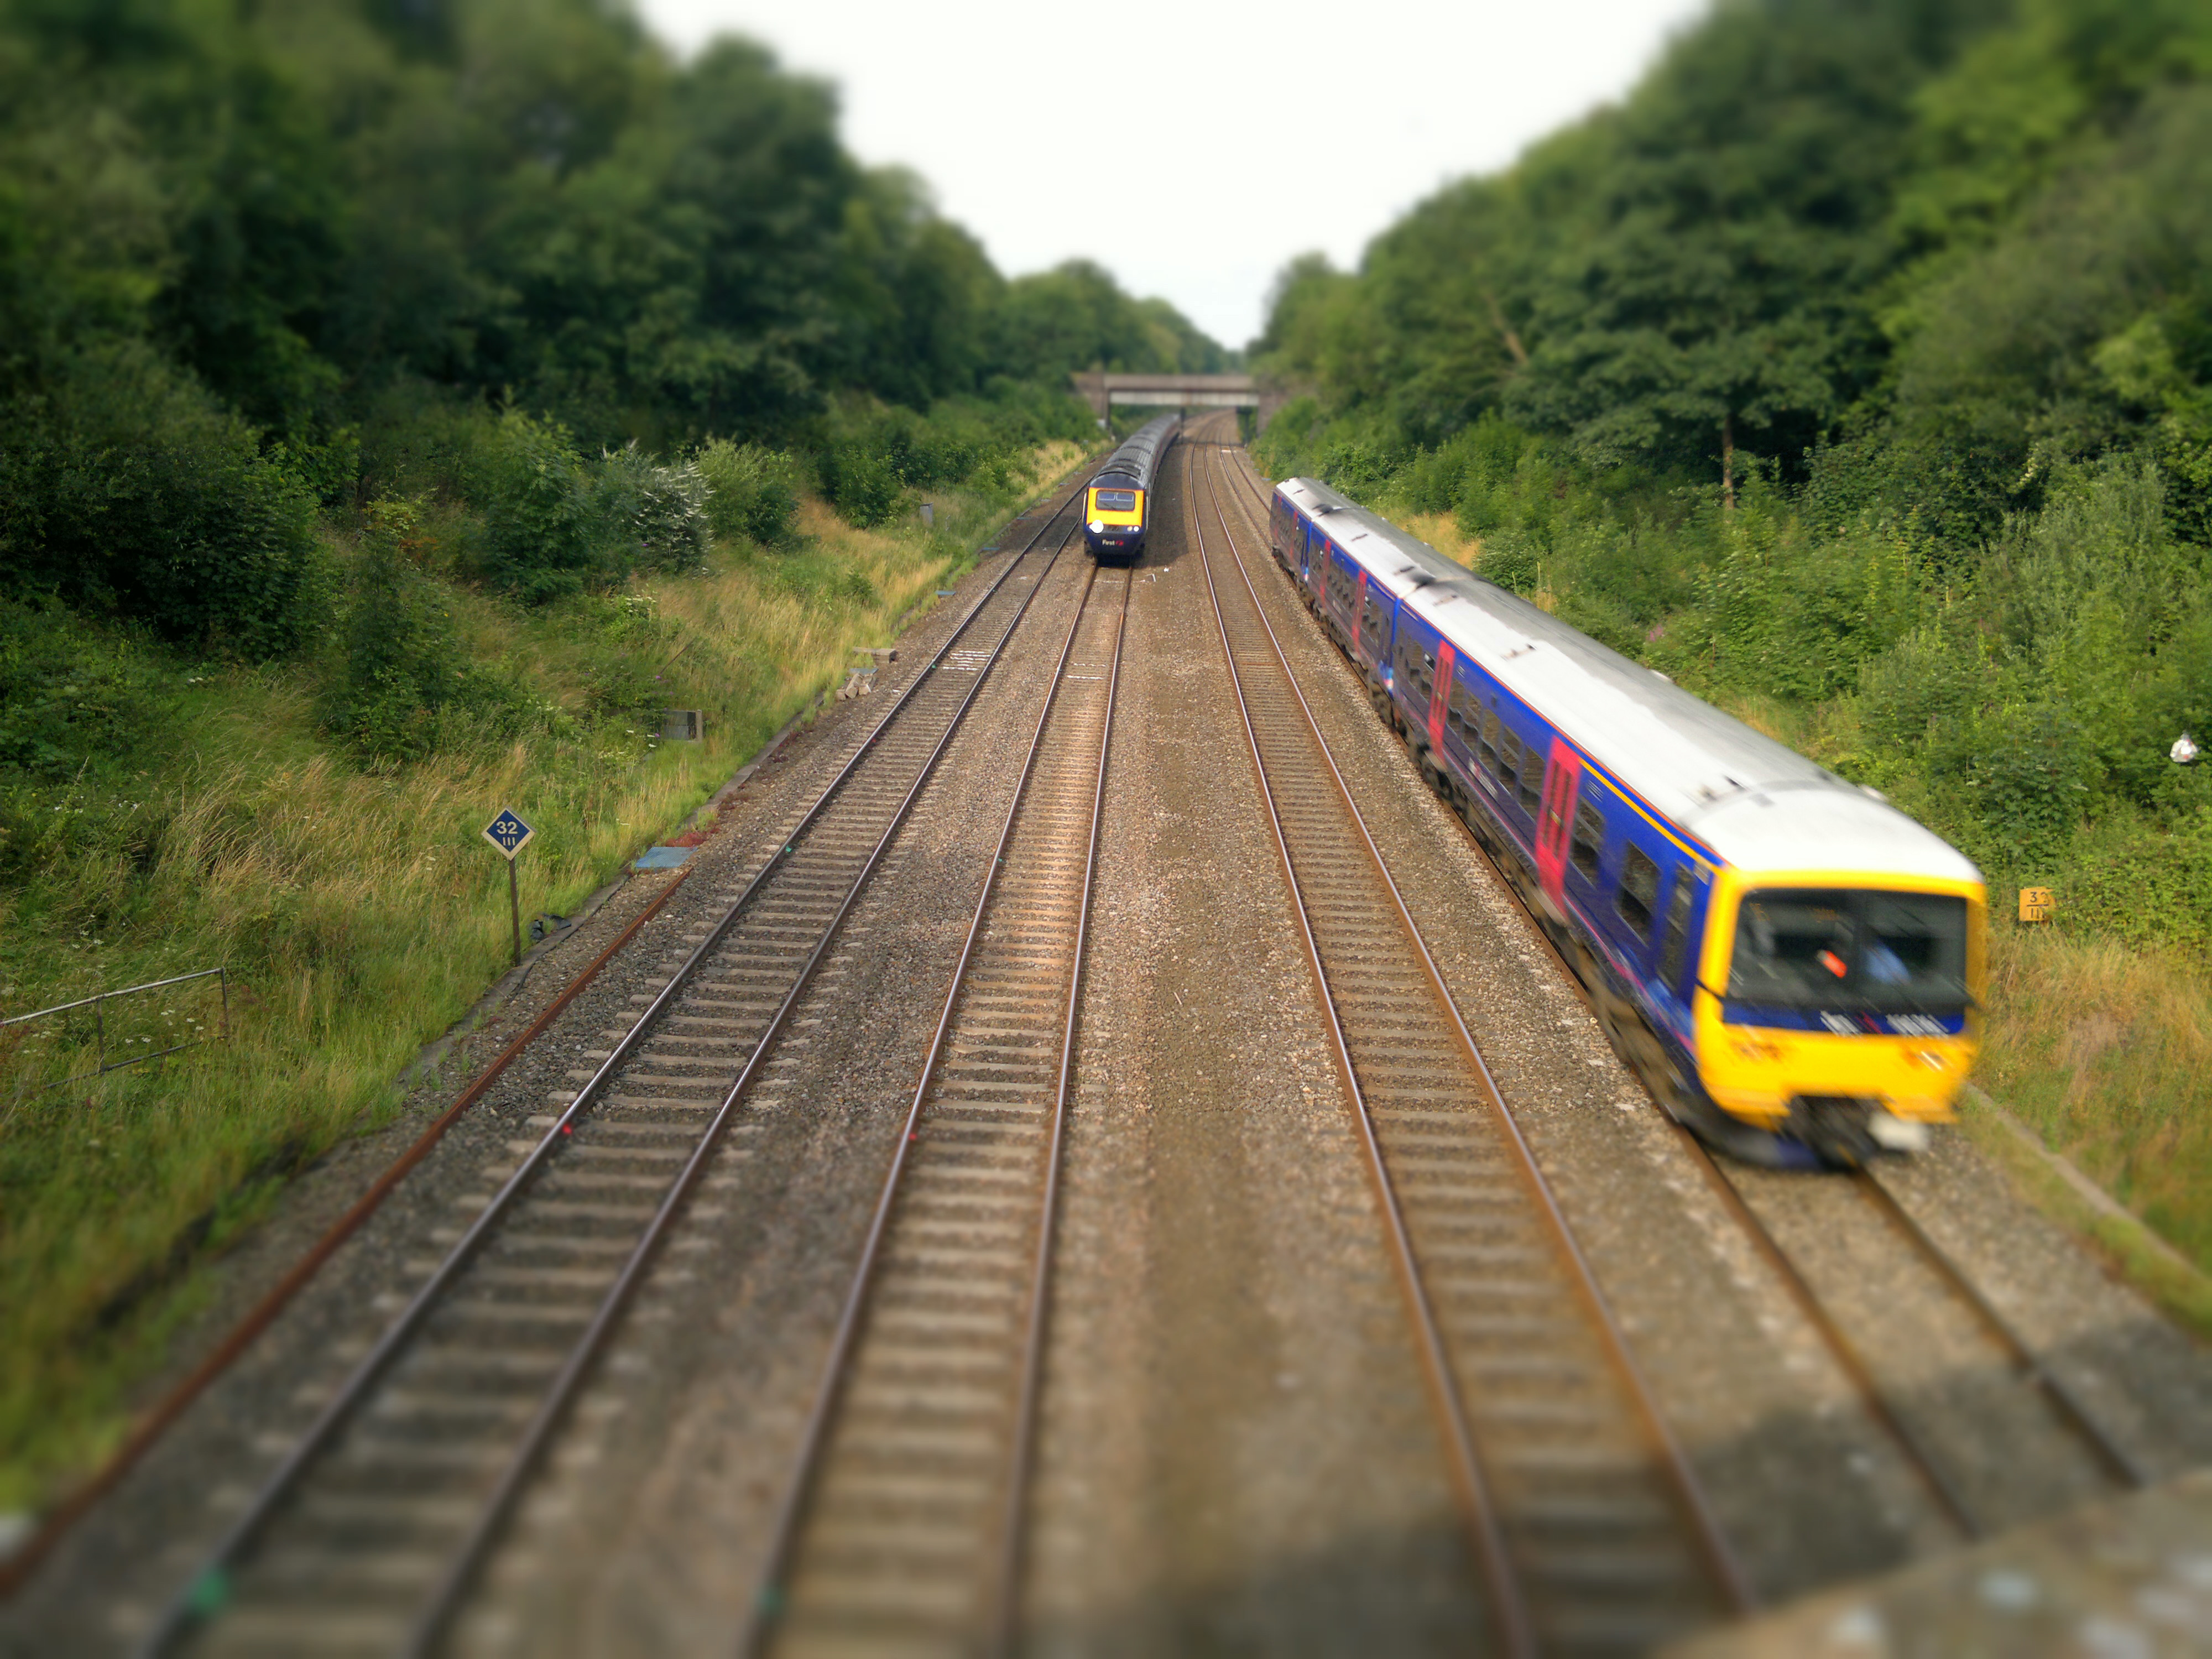
Much better. I said the effect was 'crude' above because the artificial blurring doesn't fade smoothly into the crisp portion but cuts in abruptly. It's not that noticeable in a photo like the one above, but snap something at random and the effect is exposed:
By the way, I was lying about the train shot being my second tilt shift attempt. It was actually about my tenth - there's a huge degree of trial and error involved - but then that's part of the fun of messing with photo effects, i.e. you're not trying to capture a moment, you're perfecting your 'art'!
LOMO
Somewhat easier to achieve, LOMO is a particular fish-eye style effect with "unusual saturation and colour". Think of it as "artistically cheap and nasty"! No setup needed, you just point and shoot. Here's an example:
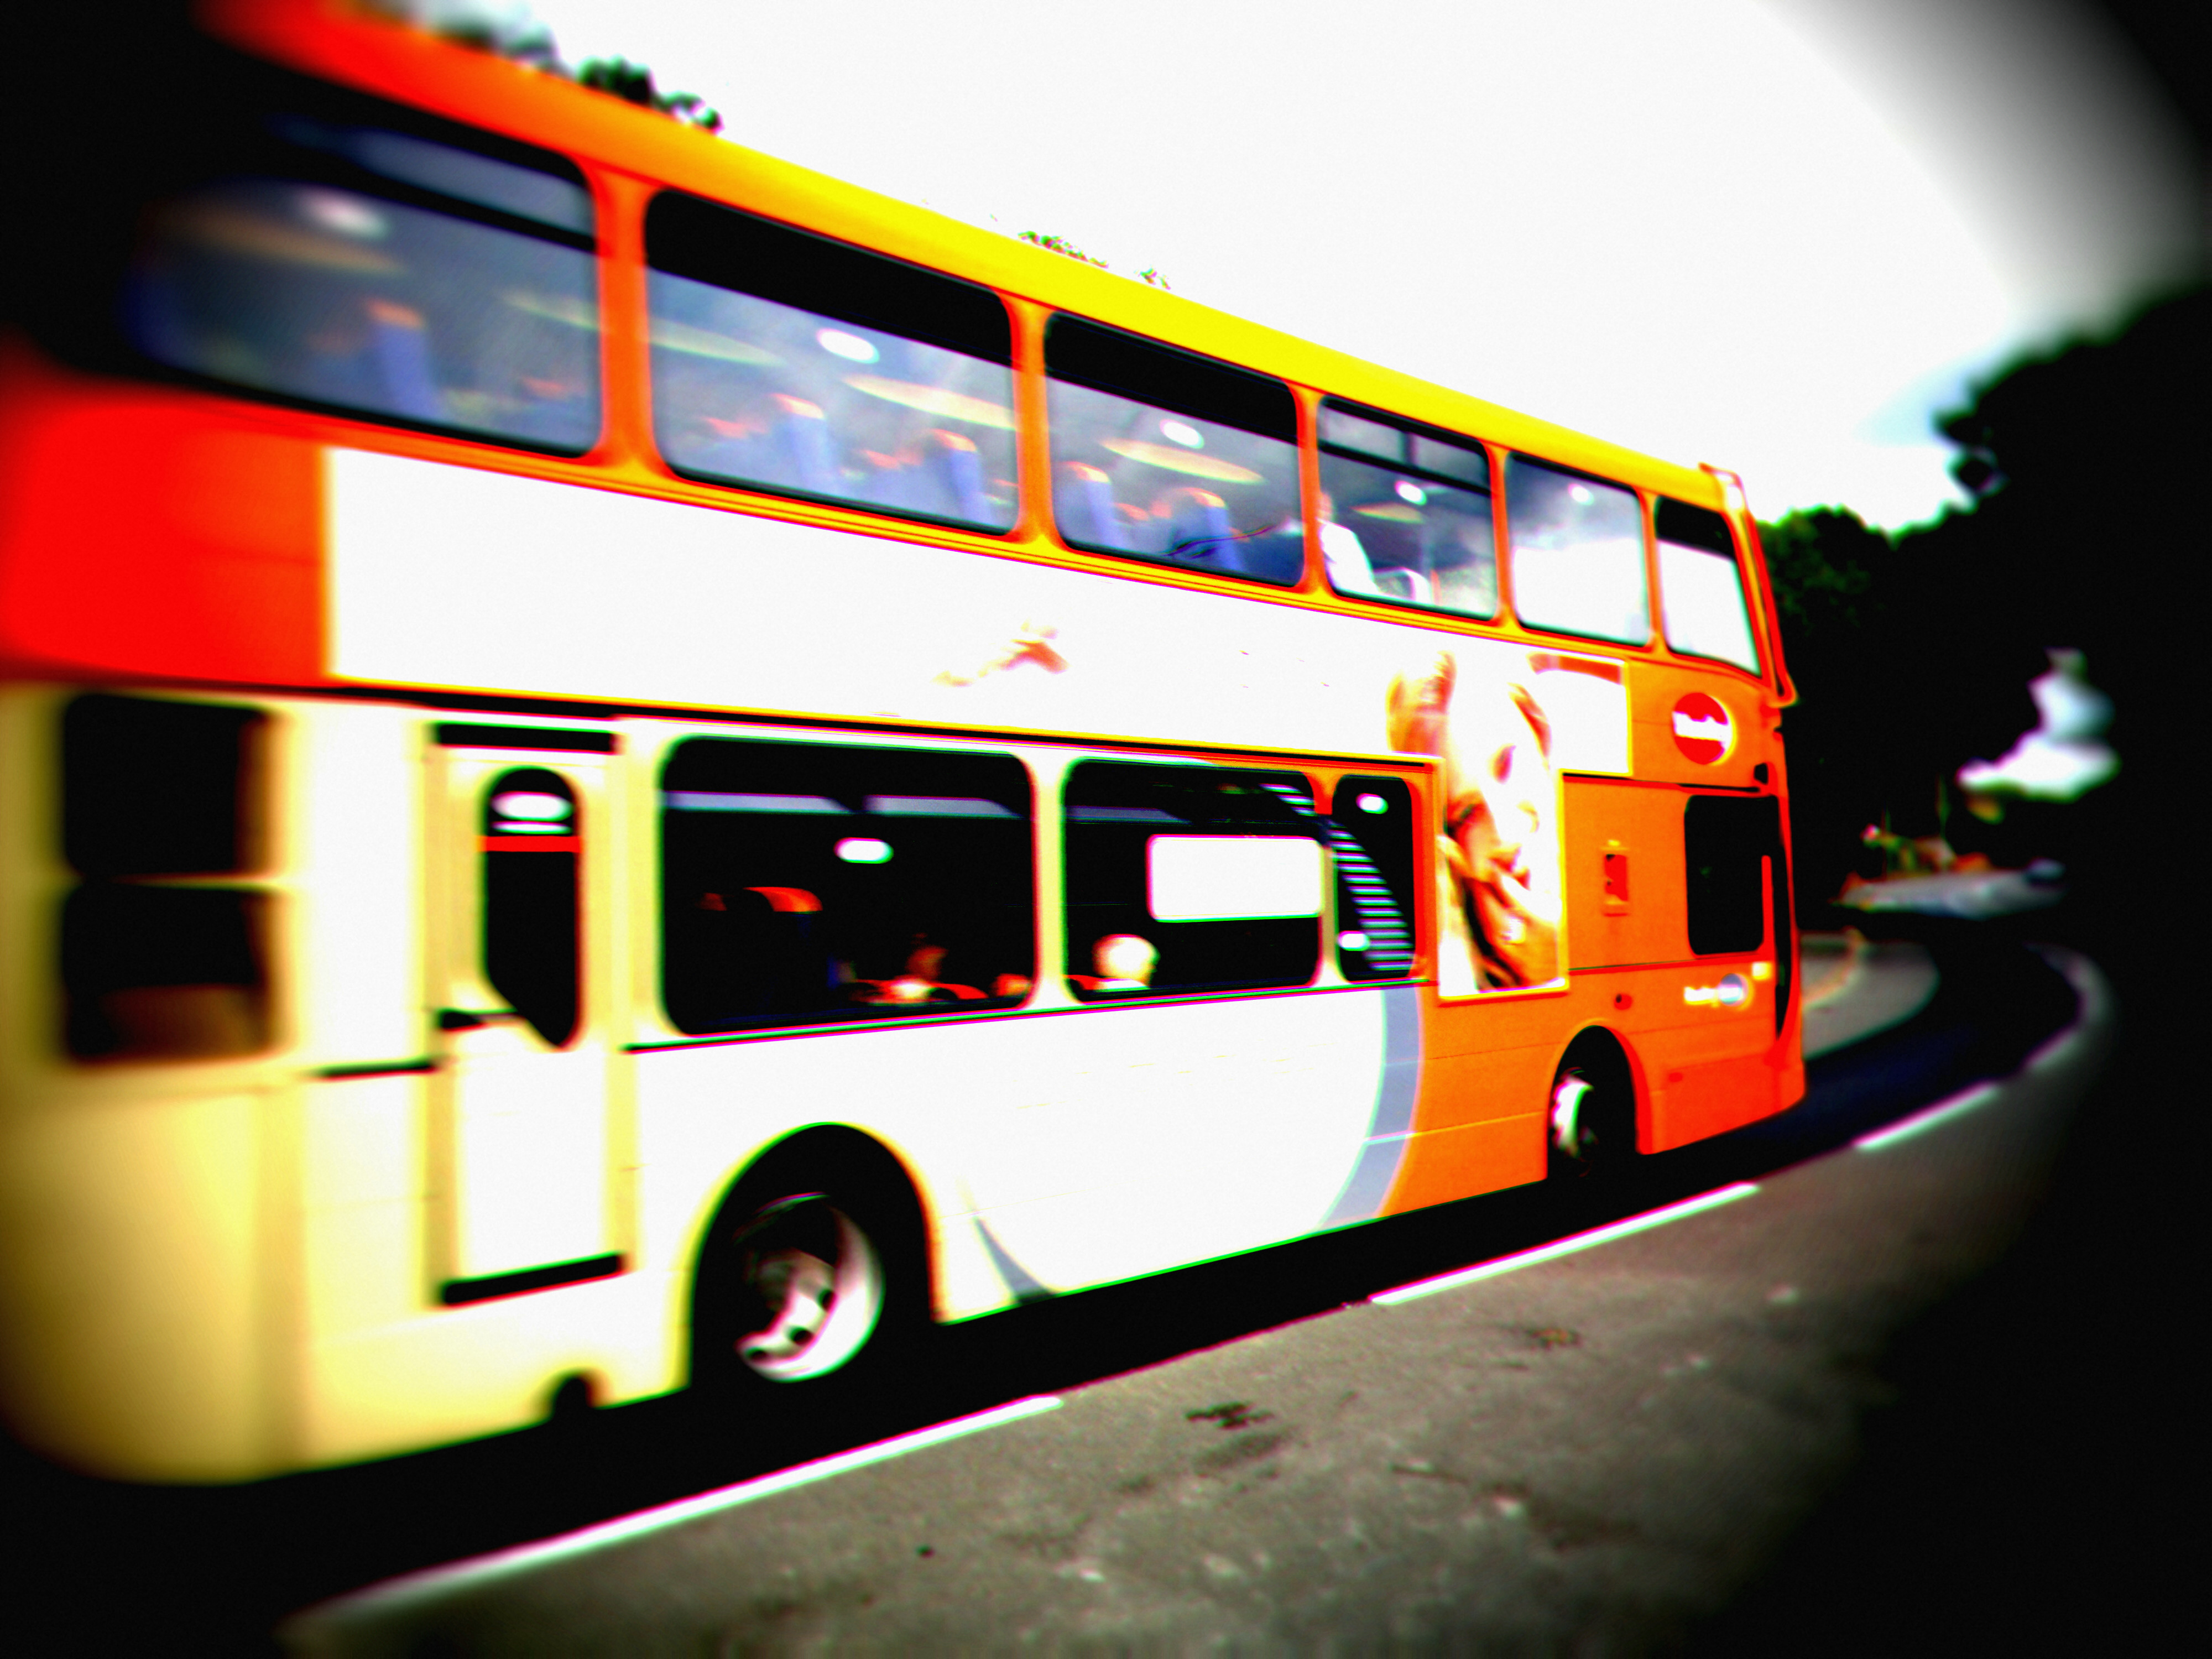
It's the sort of modern, arty effect, you might see on the cover page for a magazine feature, but I'm struggling to think of other uses for LOMO in your life. Perhaps as part of a poster, or in the banner of a web page or blog?
Anaglyph
The idea here is to create the typical red/blue(ish) images which combine to produce a 3D image when viewed with traditional 3D glasses. You shoot the first image and then this is put up as a semi-transparent overlay with an offset applied - the idea is to help you line up how far you have to move in order to shoot the second shot. Again there's trial and error, but with a little patience it does work - here's proof:
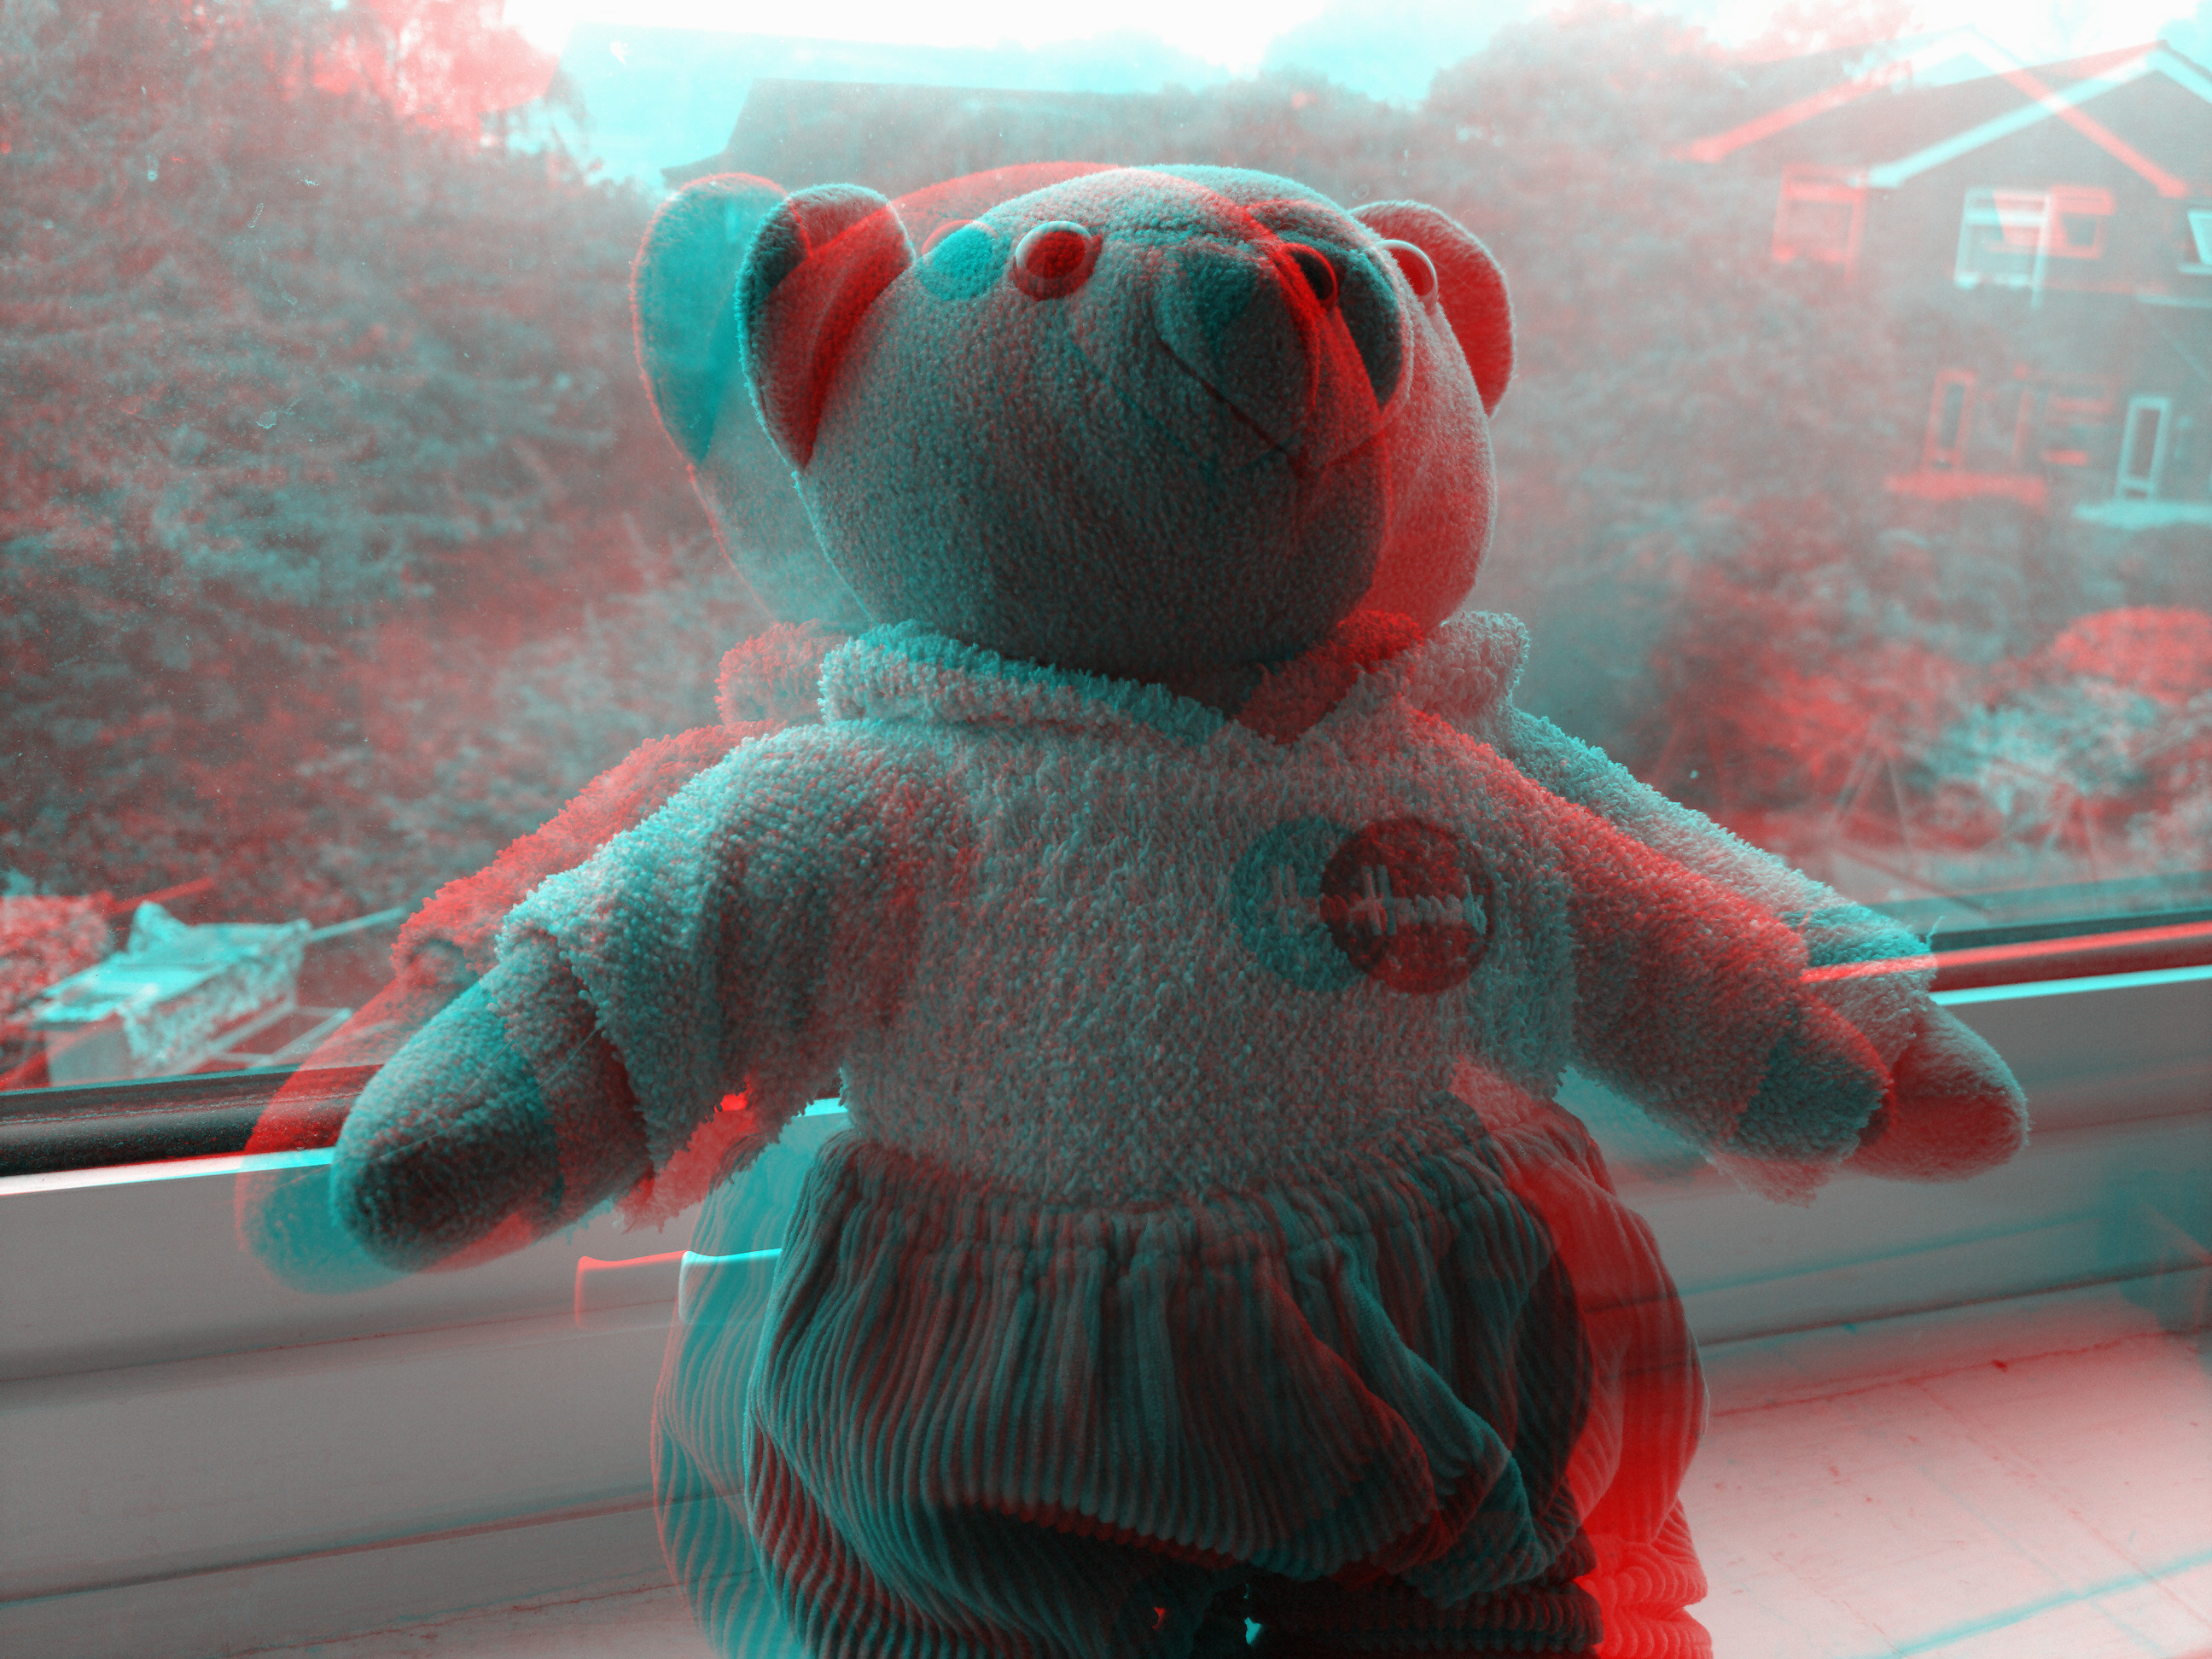
Of course, if you haven't got any glasses to hand, then I'm just impressing you with a messed up red/blue blurry mess.....! As with the movie industry, 3D is something of a gimmick - but is still something that's fun to play with.
HDR
We've seen an attempt at High Dynamic Range photos before on Symbian, you'll remember. The idea is to take three photos at different exposures and then combine their best bits to eliminate areas which are over or under-exposed. In practice this is tricky to do, not least because 99% of user photos will be taken without a tripod and so there will some movement of the phone camera between frames (taken with about a second between them). Plus your subjects may well move as well. In the case of trees and flowers, they'll sway slightly in the breeze.
The result, typically, is as bad as this, one of my first attempts at HDR with ShutterPro, showing artefacts from both phone and foliage movement:
Lots of artefacts, then. What's needed is to keep the phone absolutely still and to find a subject or situation which isn't going to change. Heading out with my phone tripod, I snapped this:
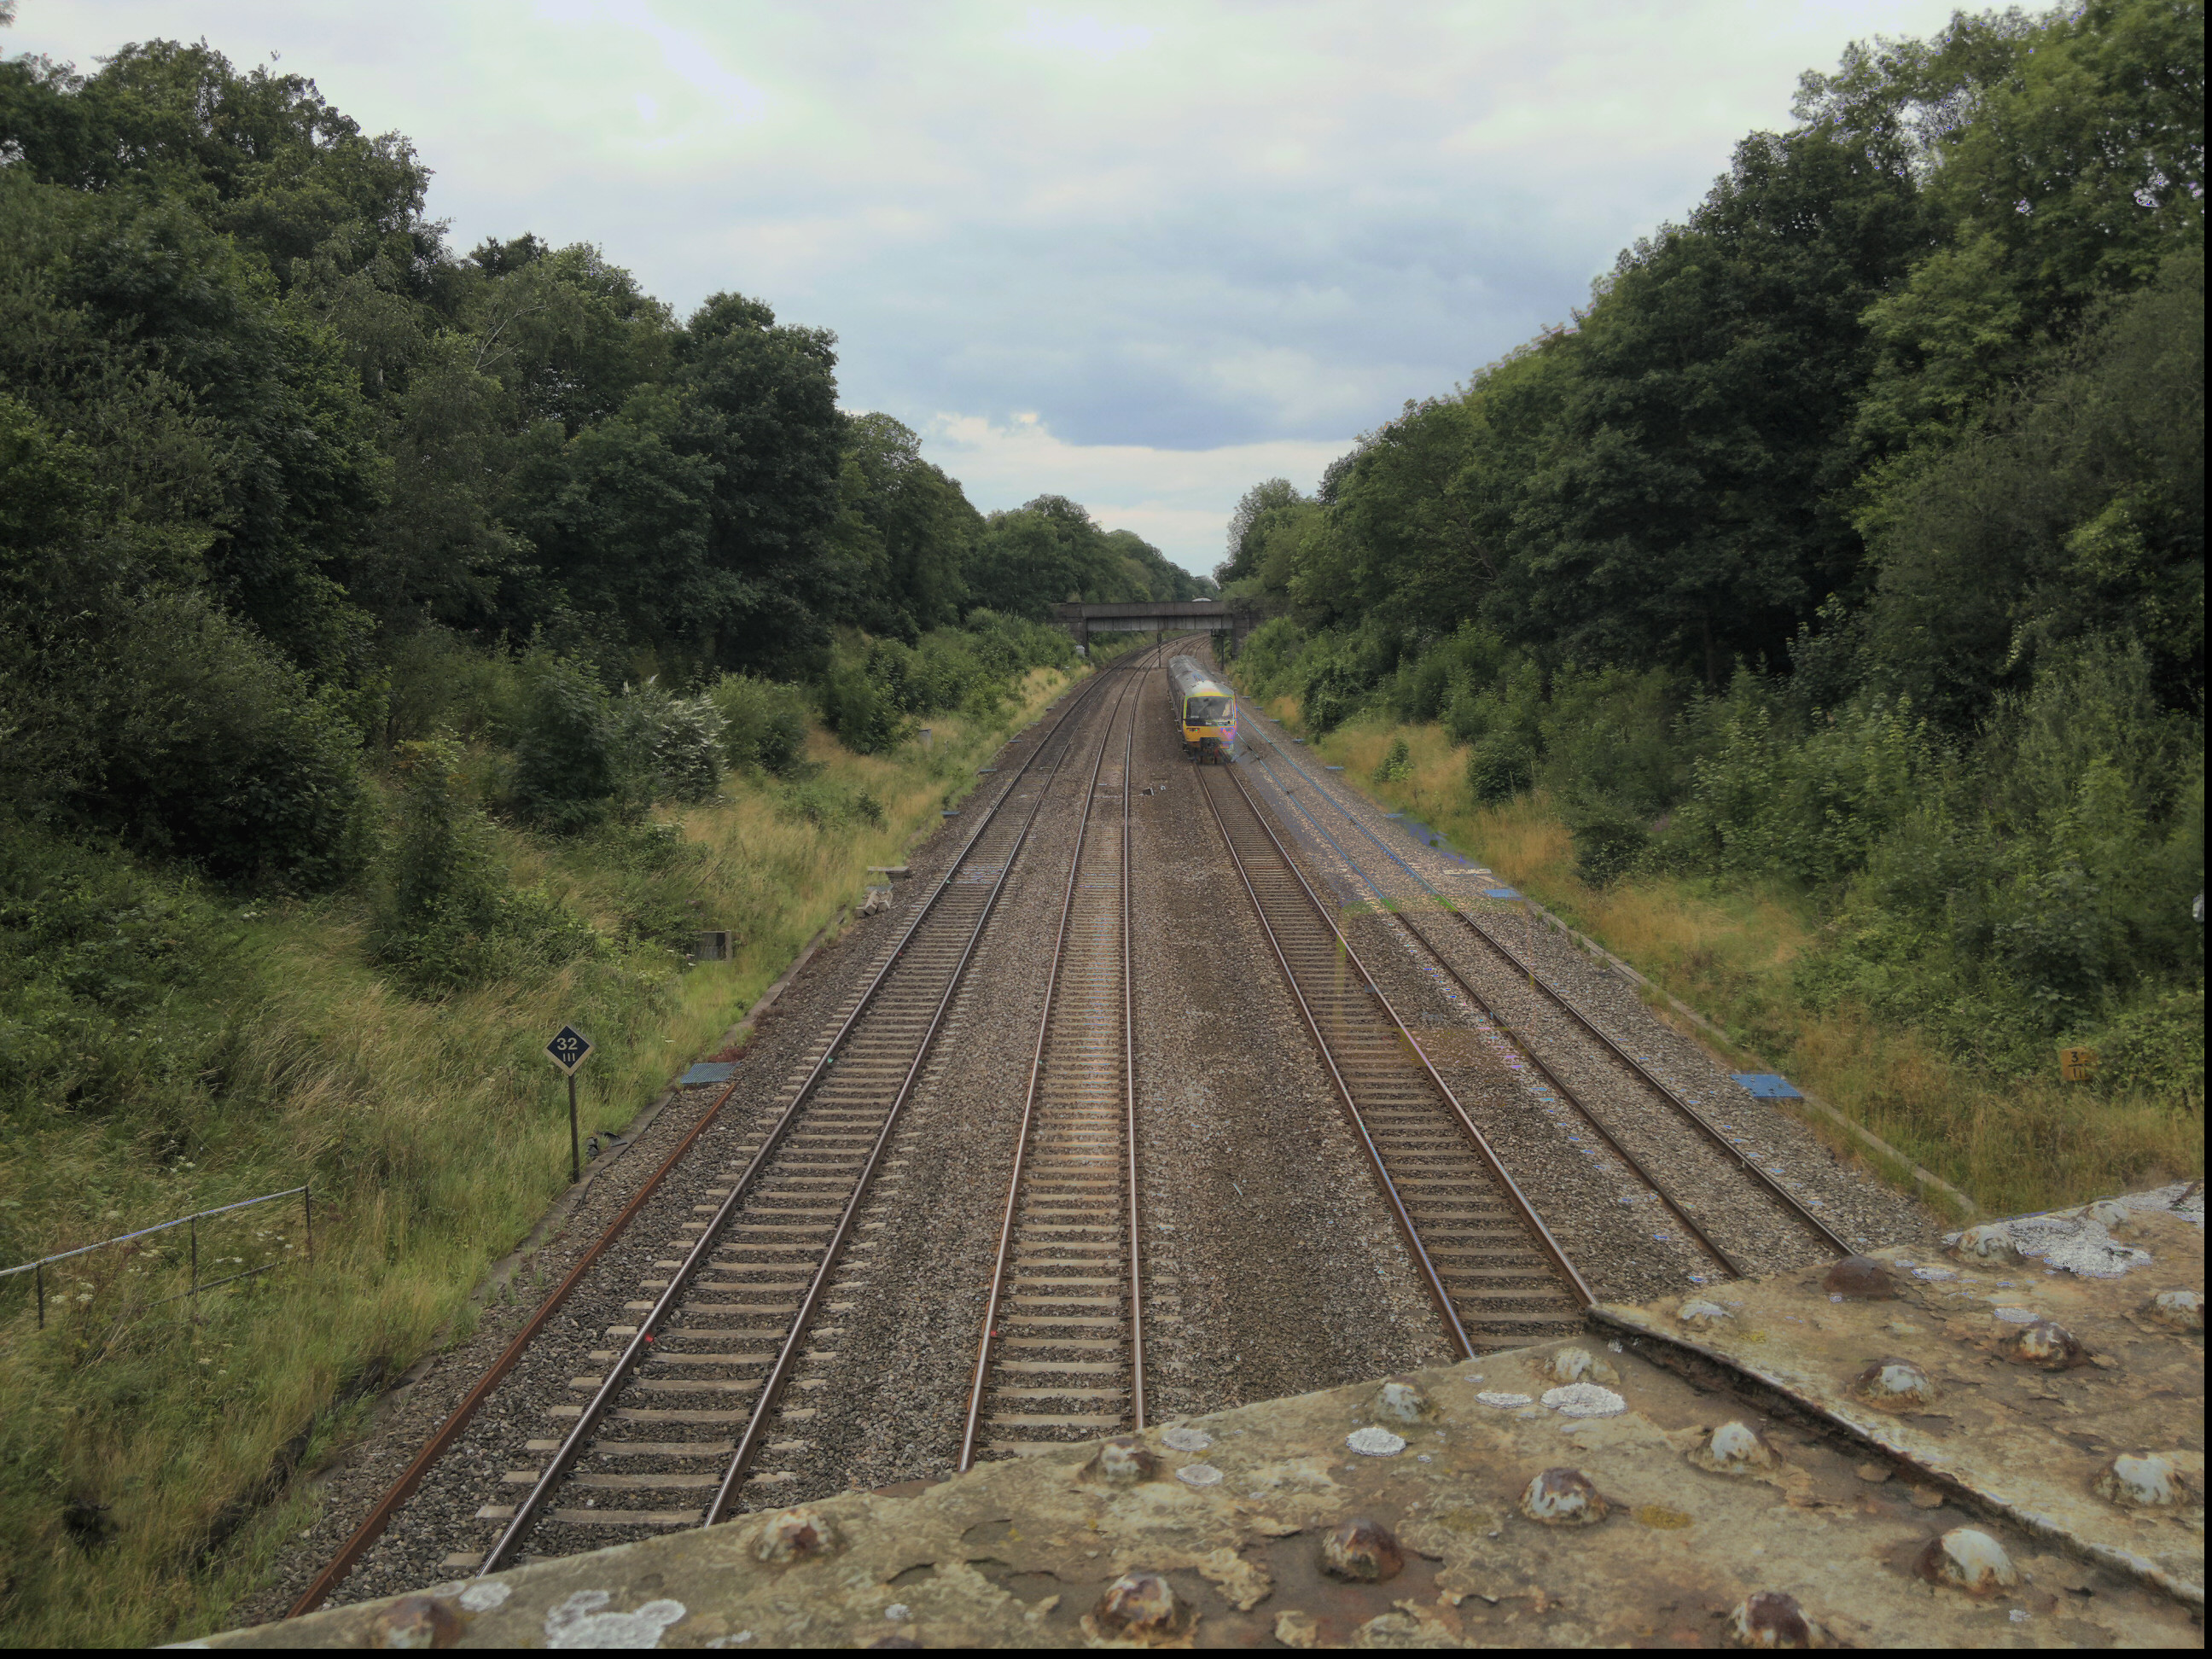
Note that the HDR part has worked, in that the dark railway verges and the bright overcast sky are both well catered for. And, to give you an idea of the time between HDR samples, you can see how far the train has moved from frame to frame....!
However, it's worth noting that part of the charm of a realistic photo is that there are big variances in contrast, just as you'd see them in real life. HDR in ShutterPro's implementation, at least, produces workable images that are a little too 'flat' in terms of light and dark. I know this was partly the aim of HDR - to cater for extremes - and in the app's defense, it's probably optimised for sunshine, something I couldn't arrange this week in the UK!
Interface polish
Not mentioned so far but important in the interface is the chance to pick from different parameters after shooting each photo. In the case of the Tilt Shift effect, for example, you can tweak the horizontal line for the effect's centre and can adjust how large the blurred top and bottom sections are. For HDR photos, you get three different photo combinations to choose from. In each case, pick and tweak as needed and then tap on the tick icon to accept. Your final image is then packaged up and you're offered the chance to save it or delete it in disgust(!)
There's an extra option, actually, in a Facebook button which sits on every 'Save' page. I tried uploading several images using this system (I was prompted to log in - successfully - to Facebook on the first attempt) but nothing actually appeared in my Facebook Photos album system, leaving me somewhat perplexed. Maybe a bug, at the very least something for the developers to look into.
Time, memory and resolution matters
I've mentioned above the initial delay when going into ShutterPro Premium. It's really not for casual, instant use! In addition, the application seems to use crazy amounts of RAM - over half the times I tried to launch it, I got a Qt error warning me that RAM was low and that ShutterPro might be unstable - even with nothing else major running on my N8. I realise that 12 megapixel images are being manipulated and that this will require tens of MB of RAM, but I still struggle with the idea that the N8 will physically run out of RAM. Surely there's extra optimisation possible within ShutterPro?
As things stand, you have to shut everything else down before starting ShutterPro, adding further to the time needed to get it going.
I mentioned resolution above - most ShutterPro operations work at the full native resolution of your phone - 12 megapixels in the N8's case, 8 megapixels in most other cases. However, processing time constraints limit the Anaglyph and HDR effects to 5 megapixels. Still plenty, of course, but worth noting.
Also worth noting is that all of the effects above were with default settings - the only things I fiddled with were the tilt shift baselines, to match my subject. Most of the advanced settings in ShutterPro are beyond me - which means they'll probably be beyond most other users too. If you understand them all then go ahead, knock yourself out and have fun!
_________________
There are two questions to answer here. One, is ShutterPro Premium worth £3 of your money in the Ovi Store? Absolutely - as the owner of an expensive smartphone, this is only a few pounds more and will give you a lot of fun trying the effects out and, who knows, you may stumble across a shot/effect that works out stunning and gives you a lot of satisfaction? There's also a 'Lite' version in the store, for free, letting you try out the interface and standard functions, though only the premium version has the effects reviewed above.
So yes, BLStream has put a lot of time and effort into the application so far and it deserves some recompense by way of sales. On all Symbian^3/Anna devices, not just the N8, since I can't see why (a few settings aside) ShutterPro wouldn't work with EDoF cameras too.
The second question is whether ShutterPro Premium is good enough to stick around on my personal Nokia N8? Reluctantly, no. The launch time, processing time and RAM restrictions all mean that it would get in the way too much, when compared to the far faster, more efficient and more nimble built-in Camera application. If I could think of a real world use for its effects, other than just 'fun' then maybe I'd change my mind - but ultimately, despite its mirroring of all the 'serious' camera parameters from Nokia's version, ShutterPro Premium boils down to its effects and there's just not a lot of call for tilt shift, LOMO or 3D in my world. HDR would be great if it was foolproof, but I'm sorry, I don't carry my tripod everywhere with me.
A mixed bag then. Hopefully, after numerous examples and 2100 words, you've already decided whether ShutterPro Premium is for you.
Buy Link | Download / Information Link
0 komentar:
Post a Comment